Cloudflare
The Cloudflare integration provides a fully managed, no-code way to monitor and protect your application traffic using Castle's risk scoring and policy engine. With just a few configuration steps, you can deploy Castle’s detection and blocking capabilities directly into your Cloudflare environment—no application code changes required.
This guide walks you through the setup process and outlines supported features.
Key benefits
- No-code setup with guided onboarding
- Real-time visibility into suspicious and malicious traffic
- Seamless integration with Castle’s risk and policy engines
- Continuous updates through the Castle Dashboard
How It Works
Castle installs a Cloudflare Worker in your environment, which automatically updates as you adjust settings in the Castle Dashboard. This worker acts as a seamless bridge between your app and Castle—eliminating the need for direct integration with the Filter API.
Once deployed, the Castle Worker begins monitoring incoming HTTP requests to your application. It uses AI to infer which Castle Event each request represents.
For example, a POST request to /login is likely a login attempt, and will be classified as a Login Attempted event. During setup, you’ll be able to choose which events to monitor and protect.
- See Castle standard events for a full list of supported event types.
- Learn more about Cloudflare Workers
Prerequisites
Before you begin, make sure you have the following:
-
Castle Permissions
Your Castle account must be either Admin or Owner role
-
Cloudflare Account with Admin Access
You'll need sufficient permissions to create an API token.
-
Access to Cloudflare Workers
Sign up at Cloudflare Workers.
- Cloudflare offers a free tier to get started
- For production environments, Castle recommends a paid plan
- See Cloudflare pricing for current details
-
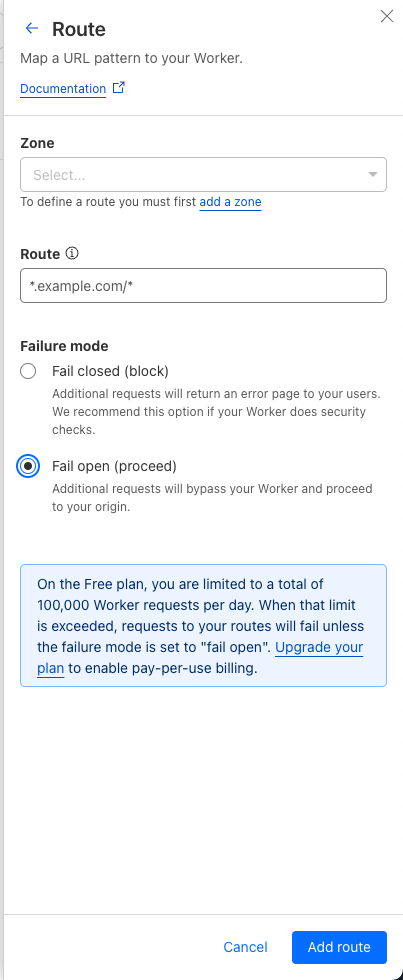
Fail-Open Setting (Free Plan Only)
If you're using the free Cloudflare plan, ensure that fail open is enabled. This prevents downtime in case you exceed the daily request quota for workers.
Configuration
Follow these steps to set up the Castle + Cloudflare integration. Total setup time is approximately 5 minutes.
Step 1: Create a Cloudflare API Token
-
Open the Cloudflare Dashboard
-
Navigate to Manage Account → Account API Tokens
-
Click Create Token, then use the Edit Cloudflare Workers template
-
Add another permission for reading DNS Settings. Castle needs this to display available domains for installation:
Zone → DNS Settings → Read
-
Choose a "Zone Resource". If you're not sure, select to include all zones from the applicable account.
-
Create and copy the token
Step 2: Connect Castle to Cloudflare
Note: In this step, Castle only connects to Cloudflare to manage the integration. No changes are made to your application or infrastructure.
-
In the Castle Dashboard, select the environment you want to connect
(Free plans include only one: theSandbox environment)
-
Paste the API token you created in Step 1
-
Castle will validate the token and check for required permissions
Once validated, you’ll see a Cloudflare item in the navigation menu. This is only visible to users with the Environment Manager role (Admin or Owner)
Step 3: Configure Worker Routes and Settings
If you already use Cloudflare Workers, ensure none share a route with the Castle worker. Cloudflare doesn’t allow multiple workers on the same route.
- In the Cloudflare section, open the Settings tab
- Click Configure Worker
- Select the domains and routes you want Castle to monitor. We recommend starting with a test path if unsure.
Then configure the following options:
-
Automatic
castle.jsinjectionInjects Castle’s fingerprinting script automatically into the
<body>of HTML pages. Recommended: Leave enabled unless you plan to include the script manually. -
Automatic email extraction
Extracts
emailfields from JSON or form posts to help identify users and improve abuse detection. Recommended. This is based on submitted form data, not necessarily the true account credentials. -
Response configuration
Customize the client response for blocked requests (e.g., different responses for Login vs. Registration). See the “Response Configuration” below section for options.
When you're done, click Deploy Worker in the top-right corner.
✅ Castle will now deploy the Cloudflare worker and begin monitoring traffic.
Need to revert? Just click Remove Worker to restore your Cloudflare environment.
Step 4: Configure Event Rules
Once requests reach your worker, you’ll see them appear in Suggested Rules under the Event Rules tab. Event Rules is a heuristic for how to map HTTP request data into a semantic event, e.g. POST /login to "Login Attempted". Castle uses AI to analyze and suggest rules, so you don't have to create these from scratch.
Don’t see traffic?Try interacting with your site. Note that Castle doesn’t monitor GET requests by default, so a login attempt or similar is a good way to generate traffic.
The Suggested Rules table contains rules that are automatically recognized by Castle, and shows:
- Detected event mappings (e.g.,
POST /login→Login Attempted) - Number of requests in the last hour
- Bot detection insights
- Estimated cost for enabling each rule
To enable rules:
- Review and select relevant rules. We recommend starting with Login and Registration. (Note. If you’re using a third party provider, on a different domain, these might not be visible.)
- Click Add Rule for each one
- Choose a processing mode (You can always change this later):
-
Async – Monitors only, no blocking available, no latency
-
Sync – Enables blocking, adds ~100ms latency + network overhead.
-
- Press "Save"
✅ Your Cloudflare integration is now active! To explore incoming traffic and events, head to the Explore view in the Castle Dashboard.
Configuration options
Sync mode and latency
When creating an Event Rule, you're required to select processing mode. There are two options available:
- Async mode. The Cloudflare worker sends matching requests to Castle in a completely asynchronous mode, which means that there is no added latency to any actions performed in your app. In this mode, you're not able to set up blocking policies to actually stop malicious traffic, since this requires waiting for the response from Castle servers.
- Sync mode. The Cloudflare worker sends matching requests to Castle in a synchronous/blocking mode, which means that the worker is aware of the response from the Castle APIs, and is able to effectively block malicious traffic according to your configuration. In this mode, there is ~100ms of latency added (plus network latency to US-east) to each request.
Castle.js auto-injection
In order to have a functional integration with Castle, you need to have the Castle.js script installed on your site. This script extracts information from the client device, and enables Castle's device fingerprinting and bot detection capabilities. The Cloudflare integration offers a way to automatically install Castle.js into your site, and unless you have specific reasons to do this manually, this is the recommended approach.
The automatic mode does the following steps:
- The Cloudflare worker will append a
scripttag with Castle.js if a matching<body>tag can be found in the payload being served, as long as theContent-Typeis set totext/html - Castle.js is pulled from an AWS Cloudfront CDN, but is then served via a proxy route, so it looks like it's hosted by your domain. E.g.
example.com/fd89vfjygrc9eyu - HTML Form submissions, XHR and Fetch requests are intercepted so that the Castle Request Token can be appended. For HTML form submission the token is added as a form field parameter, and for XHR and Fetch requests it is added as a new HTTP header. The name of this parameter will be randomized, similar to the script URL.
- The Cloudflare worker automatically picks up the new token, and forwards in to the Castle APIs.
E-mail extraction
The Cloudflare worker can be configured to automatically extract E-mail address, and pass this on to the Castle APIs. This is enabled by default, and you can turn this off e.g. in case you have privacy reasons. The extraction works by inspecting the payload of HTML form posts and JSON payloads, and look for fields names email. Note that the E-mail extraction only works for requests where the E-mail is provided as part of the payload. Castle does not remember this across requests.
Other than providing a better experience while browsing the Castle Dashboard, sending E-mail to Castle leads to improved bot and automation detection. Many attacks, like credential stuffing, are based on enumerating E-mail addresses. By providing the attempted address to Castle, at Login, Registration, Password Reset etc. this will improve detection.
Response configuration
When Castle detects a malicious request, the Cloudflare integration can be set to block these request directly at the edge, before they hit your application server. To show what's being displayed to the end user, you can configure what response the worker should return in case of a blocking request.
For the response configuration to be applicable, you need to set the event rule in "Sync" mode. Then, once the worker receives a response with a Deny action from the Castle APIs, it'll apply and serve the configured response. See Policies for more information.
By default, if a rule is configured in sync mode, Castle will respond with a 403 HTTP status code + empty body in case of a Deny response from a policy. You’re able to customize this both on a global/worker level and on a per rule level.
You can override the default response, both per event rule, and globally. In addition to this you can define specific overrides for HTML and JSON content types respectively, which allows appropriate responses, e.g. in the case your login endpoint can handle both HTML form posts and JSON requests.
For the response you can pick among common HTTP status codes. When 302 is selected you're asked to provide an URL instead of the body content.
Limitations
- The Cloudflare integration does not support user IDs. If you want to improve in-app visibility with true user information, you need to integrate the Risk API using one of Castle's SDKs.
- For the Castle Cloudflare worker to be installed correctly, there cannot be any other workers already present on the desired route(s). If there is, you need to remove them before proceeding with the installation
Updated about 1 year ago