Integrate Castle
Add bot detection and fraud prevention to your app in 8 steps.
Add Castle to your registration and login flows. By the end, you'll block bots and suspicious users automatically.
Using Cloudflare? Try Castle's no-code Cloudflare integration to get started in minutes.
Before you start
Integrating Castle with your app consists of a few steps, but before you start make sure you have:
- A Castle account with admin access.
- Your app running locally on your machine.
Your app is a "frontend" and a "backend"In this guide you can see terms "frontend" and "backend" that describe the two parts of your app:
- "frontend" is the user-facing part, for example: a React or a Vue app, an iOS or an Android app, or just a regular view from your framework of choice,
- "backend" is the API, for example: a controller in your framework of choice, or a data API you use to power your mobile app.
To fully complete this quickstart guide you need to integrate both: the frontend and the backend. It is the best to have both running locally on your machine, but you can also split the work between two teams that take care of those parts of your business.
How Castle fits into your app
Castle adds two things to your existing flows:
- Frontend: Collect a device fingerprint (request token)
- Backend: Call Castle's API before processing the action
Castle returns allow, challenge, or deny based on your Policies. You decide what happens.
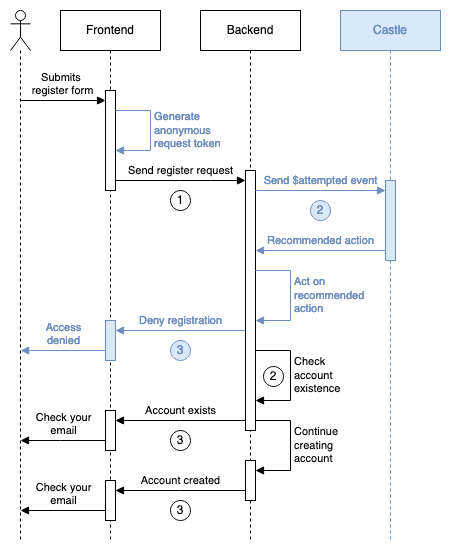
Account creation flow with Castle integration (blue)
Which API should I use?
- Filter API → Anonymous users (before login/registration succeeds)
- Risk API → Authenticated users (after login succeeds)
Integration steps
Tip: Create a feature flag so you can gradually roll out Castle to your users.
Step 1: Get your API keys
-
Go to the Castle Dashboard.
-
Click the cog icon in the bottom left corner (near your name) and select Environment settings:
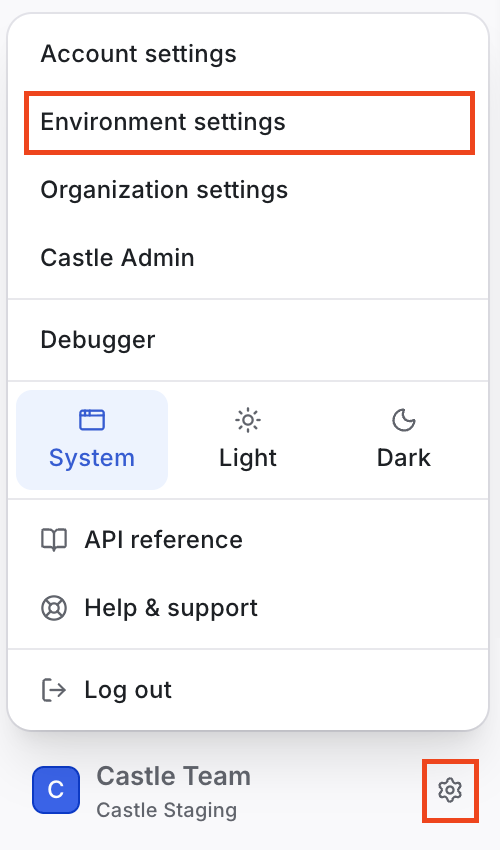
Environment settings in user settings dropdown
-
You'll find your Publishable API Key and API Secret there:
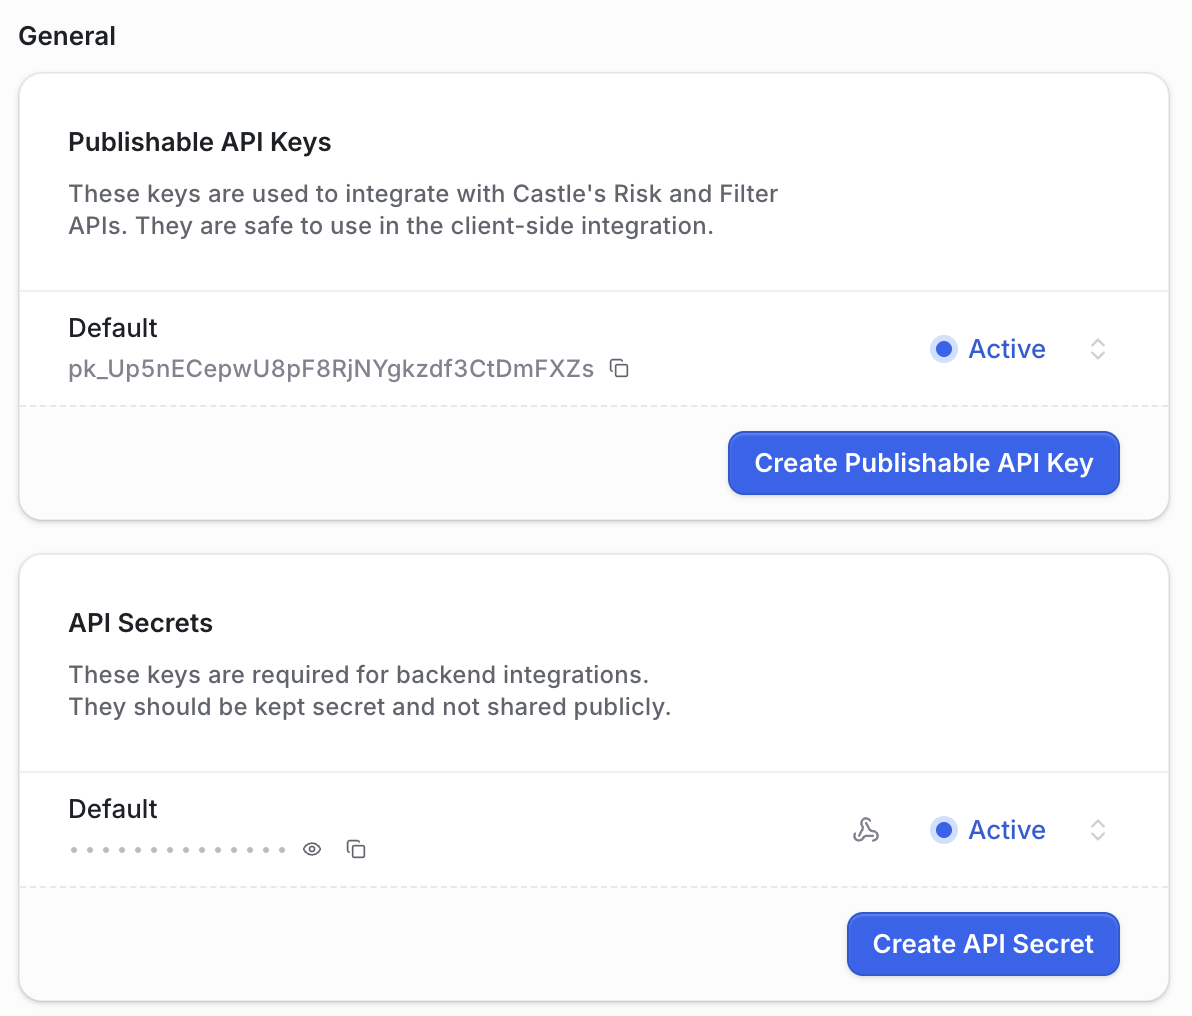
Publishable API Key and API Secret in Current environment view
Step 2: Integrate frontend SDK
Do you want to integrate a mobile app?This guide covers using the Browser SDK. If you are interested in integrating your mobile app please take a look at Mobile SDKs page for integration instructions and come back for the backend integration step.
2.1: Install the SDK
npm install --save @castleio/castle-jsyarn add @castleio/castle-js2.2: Configure it
import Castle from '@castleio/castle-js'

const castle = Castle.configure({ pk: '<YOUR_PUBLISHABLE_API_KEY>' });
Initialize the SDK everywhere, as early as possibleThe browser SDK should be initialized immediately at page load, and we recommend that you put it on all your pages. Thanks to that enough behavioral metrics can be collected - they improve accuracy, especially for bot detection.
Step 3: Integrate backend SDK
3.1: Install the SDK
gem install 'castle-rb'php composer.phar require "castle/castle-php:master"npm install --save @castleio/sdkpip install castle<dependency>
<groupId>io.castle</groupId>
<artifactId>castle-java</artifactId>
<version>2.4.0</version>
</dependency>3.2: Configure it
- Export your API Secret in
CASTLE_API_SECRETenvironment variable. - Configure the SDK:
# config/castle.rb
require 'castle'

Castle.configure do |config|
  config.api_secret = ENV.fetch('CASTLE_API_SECRET')
endCastle::setApiKey($_ENV['CASTLE_API_SECRET']);// config/castle.js
import { Castle } from '@castleio/sdk';
export const castle = new Castle({ apiSecret: process.env.CASTLE_API_SECRET });import os
from castle.configuration import configuration
configuration.api_secret = os.environ["CASTLE_API_SECRET"]// We look for the secret in the CASTLE_API_SECRET environment variable by default
Castle castle = Castle.initialize();
Server SDKs configuration optionsHere's a list of all supported server SDKs along with their configuration options: Server SDKs
Step 4: Handle the registration flow
Now comes an actual integration of a real flow in your app: the registration.
4.1: Update your registration form
- Add a hidden field that will store a request token:
<form id="registration-form" action="/register" method="post">
  <input type="hidden" name="castle_request_token" id="castle-request-token" />
  <!-- Your other fields like username and password -->
</form>
What is a request token?The request token that is generated by Castle's frontend SDK is an anonymous device fingerprint used to properly understand your users' behaviors. The token also contains required meta-data that allow you to understand and block bad behavior.
- Intercept the submit event and generate the request token:
const form = document.getElementById('registration-form');
const castleField = document.getElementById('castle-request-token');

form.addEventListener('submit', function (event) {
  event.preventDefault();
  castle.createRequestToken().then(function (token) {
    castleField.value = token;
    form.submit();
  });

  return false;
});
Request token value has to be generated for each request to your backendEach request token expires after 120 seconds and should only be used during a single request to your backend. The
@castleio/castle-jslibrary continuously monitors behavior of the user, thus the data need to be refreshed every time you call your backend to get the most accurate predictions.
4.2: Call Castle Filter API in the backend
Before you proceed with creating an account or even checking for its existence you need to call Castle's Filter API to process the request and receive a recommended action to perform:
# app.rb
require 'sinatra'
require_relative 'config/castle.rb'

castle = ::Castle::Client.new

post '/register' do
  begin
    result = castle.filter(
      request_token: request.params['castle_request_token'],
      context: ::Castle::Context::Prepare.call(request),
      type: '$registration',
      status: '$attempted',
      params: {
        email: request.params['email'], # This is optional, but will highly improve accuracy
      }
    )

    # Handle "deny" actions
    if result[:policy][:action] == 'deny'
      return [400, 'Cannot create an account right now, please try again later']
    end
  rescue ::Castle::InvalidRequestTokenError
    # Invalid request token is very likely a bad actor bypassing fingerprinting
    return [400, 'Cannot create an account right now, please try again later']
  rescue ::Castle::Error => e
    # Allow the attempt - most likely a server or timeout error
  end

  # Your code: check for existence and create user profile
  user = create_user(request)
  return [200, 'Welcome to the app! You can log in now.']
end
// Example uses Symfony 5.4 or newer and PHP 8 or newer
// src/Controller/RegistrationController.php
namespace App\Controller;
use Symfony\Component\HttpFoundation\Request;
use Symfony\Component\HttpFoundation\Response;
use Symfony\Component\HttpKernel\Exception\BadRequestHttpException;
use Symfony\Component\Routing\Annotation\Route;
class RegistrationController
{
#[Route('/register', name: 'register', method: 'POST')]
public function register(Request $request): Response
{
try {
$result = \Castle::filter([
'request_token' => $request->get('castle_request_token'),
'context' => \Castle_RequestContext::extract(),
'type' => '$registration',
'status' => '$attempted',
'params' => [
'email' => $request->get('email'), # This is optional, but will highly improve accuracy
]
]);
if ($result->policy['action'] == 'deny') {
// Handle "deny" actions
throw new BadRequestHttpException('Cannot create an account right now, please try again later');
}
} catch(\Castle_InvalidRequestTokenError) {
// Invalid request token is very likely a bad actor bypassing fingerprinting
throw new BadRequestHttpException('Cannot create an account right now, please try again later');
} catch(\Castle_Error) {
// Allow the attempt - most likely a server or timeout error
}
// Your code: check for existence and create user profile
$user = $this->createUser($request);
return new Response('Welcome to the app! You can log in now.');
}
}// Express.js
import { APIError, ContextPrepareService, InvalidRequestTokenError } from '@castleio/sdk';
import { castle } from 'config/castle.js';
app.post('/register', (req, res) => {
try {
const result = castle.filter({
request_token: req.body['castle_request_token'],
context: ContextPrepareService.call(req, {}, castle.configuration),
type: '$registration',
status: '$attempted',
params: {
email: req.body["email"], // This is optional, but will highly improve accuracy
},
});
// Handle "deny" actions
if (result.policy.action === 'deny') {
res.status(400).send('Cannot create an account right now, please try again later');
return;
}
} catch (e) {
if (e instanceof InvalidRequestTokenError) {
// Invalid request token is very likely a bad actor bypassing fingerprinting
res.status(400).send('Cannot create an account right now, please try again later');
return;
} else if (e instanceof APIError) {
// Allow attempt. Data missing or invalid, or a server or timeout error
}
}
const user = create_user(req);
res.send('Welcome to the app! You can log in now.');
});# Flask 3.0
from flask import request, make_response
from castle import CastleError, Client, ContextPrepare, InvalidRequestTokenError
castle_client = Client()
@app.route('/register', methods=['POST'])
def register():
try:
result = castle_client.filter({
'request_token': request.form['castle_request_token'],
'context': ContextPrepare.call(request),
'type': '$registration',
'status': '$attempted',
'params': {
'email': request.form['email'] # This is optional, but will highly improve accuracy
}
})
if result.policy.action == 'deny':
return 'Cannot create an account right now, please try again later', 400
except InvalidRequestTokenError:
# Invalid request token is very likely a bad actor bypassing fingerprinting
return 'Cannot create an account right now, please try again later', 400
except CastleError as e:
# Allow the attempt - most likely a server or timeout error
# Your code: check for existence and create user profile
user = create_user(request)
return 'Welcome to the app! You can log in now.'package com.your.app;
import io.castle.client.Castle;
import io.castle.client.internal.utils.CastleContextBuilder;
import io.castle.client.model.CastleApiInvalidRequestTokenException;
import io.castle.client.model.CastleResponse;
import io.castle.client.model.CastleRuntimeException;
import javax.servlet.http.HttpServletRequest;
import javax.validation.constraints.NotEmpty;
import javax.validation.constraints.NotNull;
import org.springframework.http.HttpStatus;
import org.springframework.http.ResponseEntity;
import org.springframework.stereotype.Controller;
import org.springframework.web.bind.annotation.PostMapping;
public class UserDto {
@NotNull
@NotEmpty
private String password;
@NotNull
@NotEmpty
private String email;
}
@Controller
public class AppController {
private Castle castle;
AppController() {
this.castle = Castle.initialize();
}
@PostMapping("/register")
public ResponseEntity<String> register(HttpServletRequest request, @Valid UserDto user) {
try {
CastleContextBuilder context = this.castle.contextBuilder().fromHttpServletRequest(request);
CastleResponse result = this.castle.client().filter(
ImmutableMap.builder()
.put(Castle.KEY_REQUEST_TOKEN, request.getParameter("castle_request_token"))
.put(
Castle.KEY_CONTEXT,
ImmutableMap.builder()
.put(Castle.KEY_IP, context.getIp())
.put(Castle.KEY_HEADERS, context.getHeaders())
.build()
)
.put("type", "$registration")
.put("status", "$attempted")
.put(
"params",
ImmutableMap.builder()
// This is optional, but will highly improve accuracy
.put("email", request.getParameter("email"))
.build()
)
.build()
);
if ("deny".equals(result.json().getAsJsonObject().getAsJsonObject("policy").get("action").getAsString())) {
return new ResponseEntity<String>(
"Cannot create an account right now, please try again later",
HttpStatus.BAD_REQUEST
);
}
} catch (CastleApiInvalidRequestTokenException requestTokenException) {
// Invalid request token is very likely a bad actor bypassing fingerprinting
return new ResponseEntity<String>(
"Cannot create an account right now, please try again later",
HttpStatus.BAD_REQUEST
);
} catch (CastleRuntimeException runtimeException) {
// Allow the attempt - most likely a server or timeout error
}
// Your code: check for existence and create user profile
this.createUser(user);
return new ResponseEntity<String>(
"Welcome to the app! You can log in now.",
HttpStatus.OK
);
}
}
The Filter APIThe Filter API is meant for checking the behavior of anonymous users when they act in your app. For example: they attempt a registration, they try to log in, or send a contact form message to you.
On every call to the Filter API Castle does a full behavioral check: inspect signals, calculate custom metrics and run your policies to return you a recommended action along with the scores for account abuse, account takeover, and bot detection.
Step 5: Create a policy for registration
By default all calls to Castle API's returns an "allow" action to avoid any disruptions to your business. To start blocking bots you need to create a policy that will return a deny action:
-
Go to the Castle Dashboard, open Policies page, and click Create new policy button:
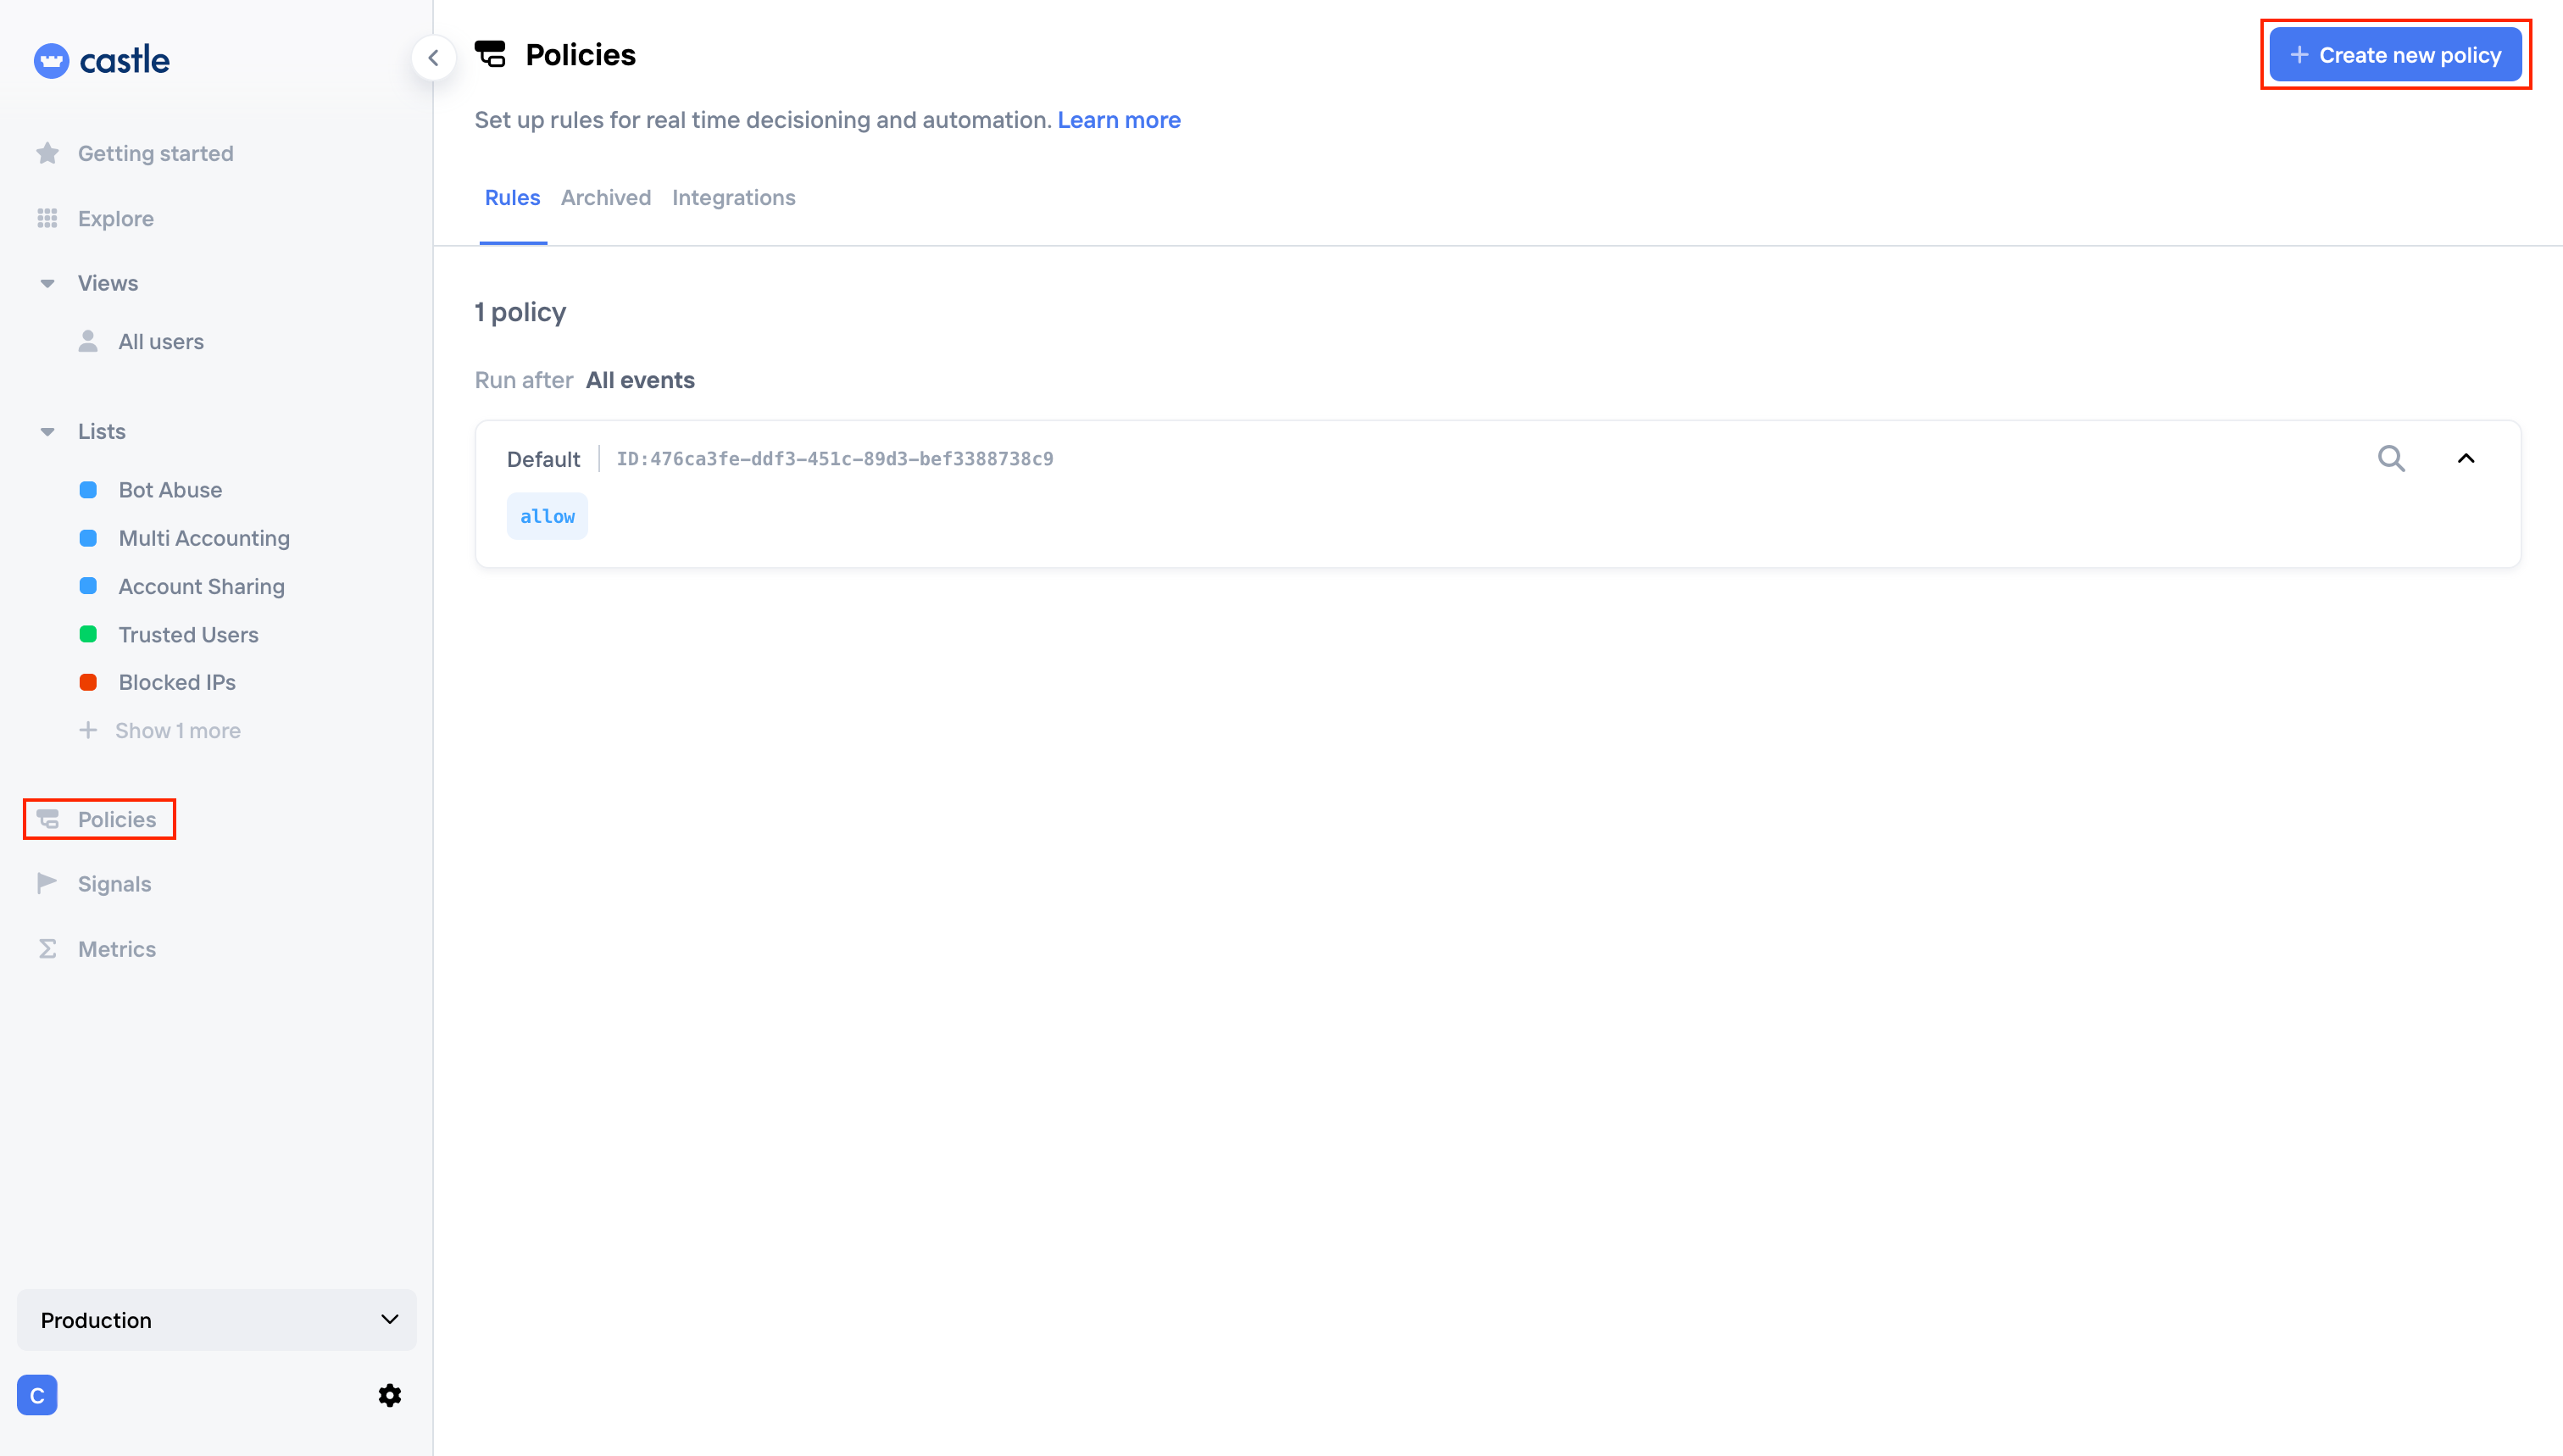
Policies view
-
Fill in the policy details:

New policy against bots registering new accounts
Recommended bot scoreAs an initial policy we recommend using 90+ bot score as a good balance to block bots, but allow legitimate users create an account. You can easily tweak it later as you see real behavior in your dashboard.
Risk scoringCastle uses machine learning models to calculate risk scores as measures of how likely a user action will result in abuse. Castle's APIs return a numerical risk score between 0.0 and 1.0, represented as 0–100 in the dashboard. Low-risk events are scored at or near zero, and high-risk events are scored at or near one.
Castle calculates risk scores for three types of abuse, designed to cover most fraud and abuse problems when used in combination with business-specific policies:
- Account Abuse Score - is the probability of a user trying to abuse your service, for example: fake accounts, multi-accounting, or account sharing.
- Account Takeover Score - the risk that an account is accessed through stolen credentials, for example: through human account takeovers or automated credential stuffing attacks.
- Bot Score - a request performed by an automated script in order to spam or consume resources.
You can learn more about risk scoring in the Risk scoring docs page.
Learn more about policiesCheck out Castle's policies guide to learn more how you can leverage policies, for example:
- Blocking signups using disposable email services,
- Blocking signups from devices with multiple accounts connected to it,
- Challenging logins with too many failed attempts from the same IP.
Step 6: Handle the login flow
Let's handle another important flow in your app: the login process.
6.1: Update your login form
- Add a hidden field that will store a request token:
<form id="login-form" action="/login" method="post">
  <input type="hidden" name="castle_request_token" id="castle-request-token" />
  <!-- Your other fields like username and password -->
</form>- Intercept the submit event and generate the request token:
const form = document.getElementById('login-form');
const castleField = document.getElementById('castle-request-token');

form.addEventListener('submit', function (event) {
  event.preventDefault();
  castle.createRequestToken().then(function (token) {
    castleField.value = token;
    form.submit();
  });

  return false;
});
Generating request tokensAs you see, generating request tokens is the same for both register and login actions. You can reuse the same pattern in other forms and actions you want to secure, for example when you are protecting transactions.
6.2: Call Castle's Risk API upon successful login
# app.rb
require 'sinatra'
require_relative 'config/castle.rb'

castle = ::Castle::Client.new

post '/login' do
  # Your code: check for existence and login the user
  user = login_user(request)

  # Successful login: Castle Risk API call
  begin
    result = castle.risk(
      request_token: request.params['castle_request_token'],
      context: ::Castle::Context::Prepare.call(request),
      type: '$login',
      status: '$succeeded',
      user: {
        id: user.id.to_s,
      }
    )

    # Handle "deny" responses
    if result[:policy][:action] == 'deny'
      return [400, 'Invalid username and/or password']
    end
  rescue ::Castle::InvalidRequestTokenError
    # Invalid request token is very likely a bad actor bypassing fingerprinting
    return [400, 'Invalid username and/or password']
  rescue ::Castle::Error => e
    # Allow the attempt - most likely a server or timeout error
  end

  return [200, { 'Set-Cookie': user.cookie }, 'Welcome to the app!']
end
// Example uses Symfony 5.4 or newer and PHP 8 or newer
// src/Controller/LoginController.php
namespace App\Controller;
use Symfony\Component\HttpFoundation\Request;
use Symfony\Component\HttpFoundation\Response;
use Symfony\Component\HttpKernel\Exception\BadRequestHttpException;
use Symfony\Component\Routing\Annotation\Route;
class LoginController
{
#[Route('/login', name: 'login', method: 'POST')]
public function login(Request $request): Response
{
$user = $this->login($request);
// Successful login: Castle Risk API call
try {
$result = \Castle::risk([
'request_token' => $request->get('castle_request_token'),
'context' => \Castle_RequestContext::extract(),
'type' => '$login',
'status' => '$succeeded',
'user' => [
'id' => $user->id->toString(),
]
]);
if ($result->policy['action'] == 'deny') {
// Handle "deny" actions
throw new BadRequestHttpException('Invalid username and/or password');
}
} catch(\Castle_InvalidRequestTokenError) {
// Invalid request token is very likely a bad actor bypassing fingerprinting
throw new BadRequestHttpException('Invalid username and/or password');
} catch(\Castle_Error) {
// Allow the attempt - most likely a server or timeout error
}
// Continue logging in the user
$response = new Response();
$response->headers->set('Set-Cookie', $user->cookie);
return $respone;
}
}// Express.js
import { APIError, ContextPrepareService, InvalidRequestTokenError } from '@castleio/sdk';
import { castle } from 'config/castle.js';
app.post('/login', (req, res) => {
// Your code: check for existence and login the user
const user = login_user(req);
// Successful login: Castle Risk API call
try {
const result = castle.risk({
request_token: req.body['castle_request_token'],
context: ContextPrepareService.call(req, {}, castle.configuration),
type: '$login',
status: '$succeeded',
user: {
id: user.id.toString(),
},
});
// Handle "deny" actions
if (result.policy.action === 'deny') {
res.status(400).send('Invalid username and/or password');
return;
}
} catch (e) {
if (e instanceof InvalidRequestTokenError) {
// Invalid request token is very likely a bad actor bypassing fingerprinting
res.status(400).send('Invalid username and/or password');
return;
} else if (e instanceof APIError) {
// Allow attempt. Data missing or invalid, or a server or timeout error
}
}
res.cookie(user.cookie).end();
});# Flask 3.0
from flask import request, make_response
from castle import CastleError, Client, ContextPrepare, InvalidRequestTokenError
castle_client = Client()
@app.route('/login', methods=['POST'])
def login():
# Your code: check for existence and login the user
user = login_user(request)
# Successful login: Castle Risk API call
try:
result = castle_client.risk({
'request_token': request.form['castle_request_token'],
'context': ContextPrepare.call(request),
'type': '$login',
'status': '$succeeded',
'user': {
'id': str(user.id)
}
})
if result.policy.action == 'deny':
return 'Invalid username and/or password', 400
except InvalidRequestTokenError:
# Invalid request token is very likely a bad actor bypassing fingerprinting
return 'Invalid username and/or password', 400
except CastleError as e:
# Allow the attempt - most likely a server or timeout error
# Proceed with setting the cookie and persisting user session
response = make_response()
response.set_cookie('session', user.cookie)
return responsepackage com.your.app;
import javax.servlet.http.HttpServletResponse;
// ... existing imports and UserDTO clipped for brevity ...
@Controller
public class AppController {
private Castle castle;
// ... registration method clipped for brevity ...
@PostMapping("/login")
public ResponseEntity<String> login(HttpServletRequest request, HttpServletResponse response, @Valid UserDto user) {
// Your code: check for existence and login the user
User userEntity = this.loginUser(user);
// Successful login: Castle Risk API call
try {
CastleContextBuilder context = this.castle.contextBuilder().fromHttpServletRequest(request);
CastleResponse result = this.castle.client().risk(
ImmutableMap.builder()
.put(Castle.KEY_REQUEST_TOKEN, request.getParameter("castle_request_token"))
.put(
Castle.KEY_CONTEXT,
ImmutableMap.builder()
.put(Castle.KEY_IP, context.getIp())
.put(Castle.KEY_HEADERS, context.getHeaders())
.build()
)
.put("type", "$login")
.put("status", "$succeeded")
.put(
"user",
ImmutableMap.builder()
// This is optional, but will highly improve accuracy
.put("id", userEntity.getId().toString())
.build()
)
.build()
);
// Handle "deny" responses
if ("deny".equals(result.json().getAsJsonObject().getAsJsonObject("policy").get("action").getAsString())) {
return new ResponseEntity<String>(
"Invalid username and/or password",
HttpStatus.BAD_REQUEST
);
}
} catch (CastleApiInvalidRequestTokenException requestTokenException) {
// Invalid request token is very likely a bad actor bypassing fingerprinting
return new ResponseEntity<String>(
"Invalid username and/or password",
HttpStatus.BAD_REQUEST
);
} catch (CastleRuntimeException runtimeException) {
// Allow the attempt - most likely a server or timeout error
}
// Your code: Set the cookie and return user session
return new ResponseEntity<String>("", HttpStatus.OK);
}
}
The Risk APIThe Risk API is meant for checking an authenticated user's activity. For example: they logged in successfully (as in this guide), they updated their profile, or they act on your business action.
The biggest difference between the Risk API and the Filter API is the former is used for checking a user that has successfully logged in (so you measure risk of their actions in your app), whereas the latter is used to check visitors, before they log in (so you filter out abusive behavior).
6.3: Call Castle's Filter API upon failed login
# app.rb
require 'sinatra'
require_relative 'config/castle.rb'

castle = ::Castle::Client.new

post '/login' do
  # Your code: check for existence and login the user
  user = login_user(request)

  # Successful login: Castle Risk API call
  begin
    # ... clipped for brevity ...
  end

  return [200, { 'Set-Cookie': user.cookie }, 'Welcome to the app!']
rescue InvalidPasswordError
  # Invalid login: call Castle Filter API to help prevent Account Takeover
  begin
    castle.filter(
      request_token: request.params['castle_request_token'],
      context: ::Castle::Context::Prepare.call(request),
      type: '$login',
      status: '$failed',
      params: {
        email: request.params['email'], # This is optional, but will highly improve accuracy
      }
    )
  rescue ::Castle::Error
    # Catch all Castle errors here: the user used invalid password, so block them anyway
  end

  return [400, 'Invalid username and/or password']
end
// src/Controller/LoginController.php
class LoginController
{
#[Route('/login', name: 'login', method: 'POST')]
public function login(Request $request): Response
{
try {
$user = $this->login($request);
// Successful login: Castle Risk API call
try {
// ... clipped for brevity...
}
// Continue logging in the user
$response = new Response();
$response->headers->set('Set-Cookie', $user->cookie);
return $respone;
} catch(InvalidPasswordException) {
// Invalid login: call Castle Filter API to help prevent Account Takeover
try {
\Castle::filter([
'request_token' => $request->get('castle_request_token'),
'context' => \Castle_RequestContext::extract(),
'type' => '$login',
'status' => '$failed',
'params' => [
'email' => $request->get('email'), // This is optional, but will highly improve accuracy
]
]);
} catch(\Castle_Error) {
// Catch all Castle errors here: the user used invalid password, so block them anyway
}
throw new BadRequestHttpException('Invalid username and/or password');
}
}
}// Express.js
import { APIError, ContextPrepareService, InvalidRequestTokenError } from '@castleio/sdk';
import { castle } from 'config/castle.js';
app.post('/login', (req, res) => {
try {
// Your code: check for existence and login the user
const user = login_user(req);
// Successful login: Castle Risk API call
try {
// ... clipped for brevity ...
}
res.cookie(user.cookie).end();
} catch(e) {
if (e typeof InvalidPasswordError) {
// Invalid login: call Castle Filter API to help prevent Account Takeover
try {
castle.risk({
request_token: req.body['castle_request_token'],
context: ContextPrepareService.call(req, {}, castle.configuration),
type: '$login',
status: '$failed',
params: {
email: req.body["email"], // This is optional, but will highly improve accuracy
},
});
} catch(e) {
// Catch all Castle errors here: the user used invalid password, so block them anyway
}
res.status(400).send('Invalid username and/or password');
return;
}
}
});# Flask 3.0
from flask import request, make_response
from castle import CastleError, Client, ContextPrepare, InvalidRequestTokenError
castle_client = Client()
@app.route('/login', methods=['POST'])
def login():
try:
# Your code: check for existence and login the user
user = login_user(request)
# Successful login: Castle Risk API call
try:
# ... clipped for brevity ...
# Proceed with setting the cookie and persisting user session
response = make_response()
response.set_cookie('session', user.cookie)
return response
except InvalidPasswordError:
# Invalid login: call Castle Filter API to help prevent Account Takeover
try:
castle_client.risk({
'request_token': request.form['castle_request_token'],
'context': ContextPrepare.call(request),
'type': '$login',
'status': '$failed',
'params': {
'email': request.form['email'] # This is optional, but will highly improve accuracy
}
})
except CastleError as e:
# Catch all Castle errors here: the user used invalid password, so block them anyway
return 'Invalid username and/or password', 400package com.your.app;
import javax.servlet.http.HttpServletResponse;
// ... existing imports and UserDTO clipped for brevity ...
@Controller
public class AppController {
private Castle castle;
// ... registration method clipped for brevity ...
@PostMapping("/login")
public ResponseEntity<String> login(HttpServletRequest request, HttpServletResponse response, @Valid UserDto user) {
try {
// Your code: check for existence and login the user
User userEntity = this.loginUser(user);
// Successful login: Castle Risk API call
try {
// ... clipped for brevity ...
}
// Your code: Set the cookie and return user session
return new ResponseEntity<String>('', HttpStatus.OK);
} catch(InvalidPasswordException e) {
// Invalid login: call Castle Filter API to help prevent Account Takeover
try {
CastleContextBuilder context = this.castle.contextBuilder().fromHttpServletRequest(request);
CastleResponse result = this.castle.client().filter(
ImmutableMap.builder()
.put(Castle.KEY_REQUEST_TOKEN, request.getParameter("castle_request_token"))
.put(
Castle.KEY_CONTEXT,
ImmutableMap.builder()
.put(Castle.KEY_IP, context.getIp())
.put(Castle.KEY_HEADERS, context.getHeaders())
.build()
)
.put("type", "$login")
.put("status", "$failed")
.put(
"params",
ImmutableMap.builder()
// This is optional, but will highly improve accuracy
.put("email", request.getParameter("email"))
.build()
)
.build()
);
} catch(CastleRuntimeException exception) {
// Catch all Castle errors here: the user used invalid password, so block them anyway
}
return new ResponseEntity<String>(
"Invalid username and/or password",
HttpStatus.BAD_REQUEST
);
}
}
}
Making multiple calls to Castle APIsYou should reuse the request token for multiple calls to Castle APIs within a single call to your backend. It must represent a single action in your app though.
For example: call Filter API with
$login$attemptedto get initial scoring (to filter out abusive IPs from even trying to log in), then call Risk API with$login$succeeded(to assess risk of account takeover) using the same request token.
Step 7: Create a policy for logging in
7.1: Block bots logging in
-
Go to the policies page in Castle's Dashboard and click Create new policy button.
-
Fill in the policy details:
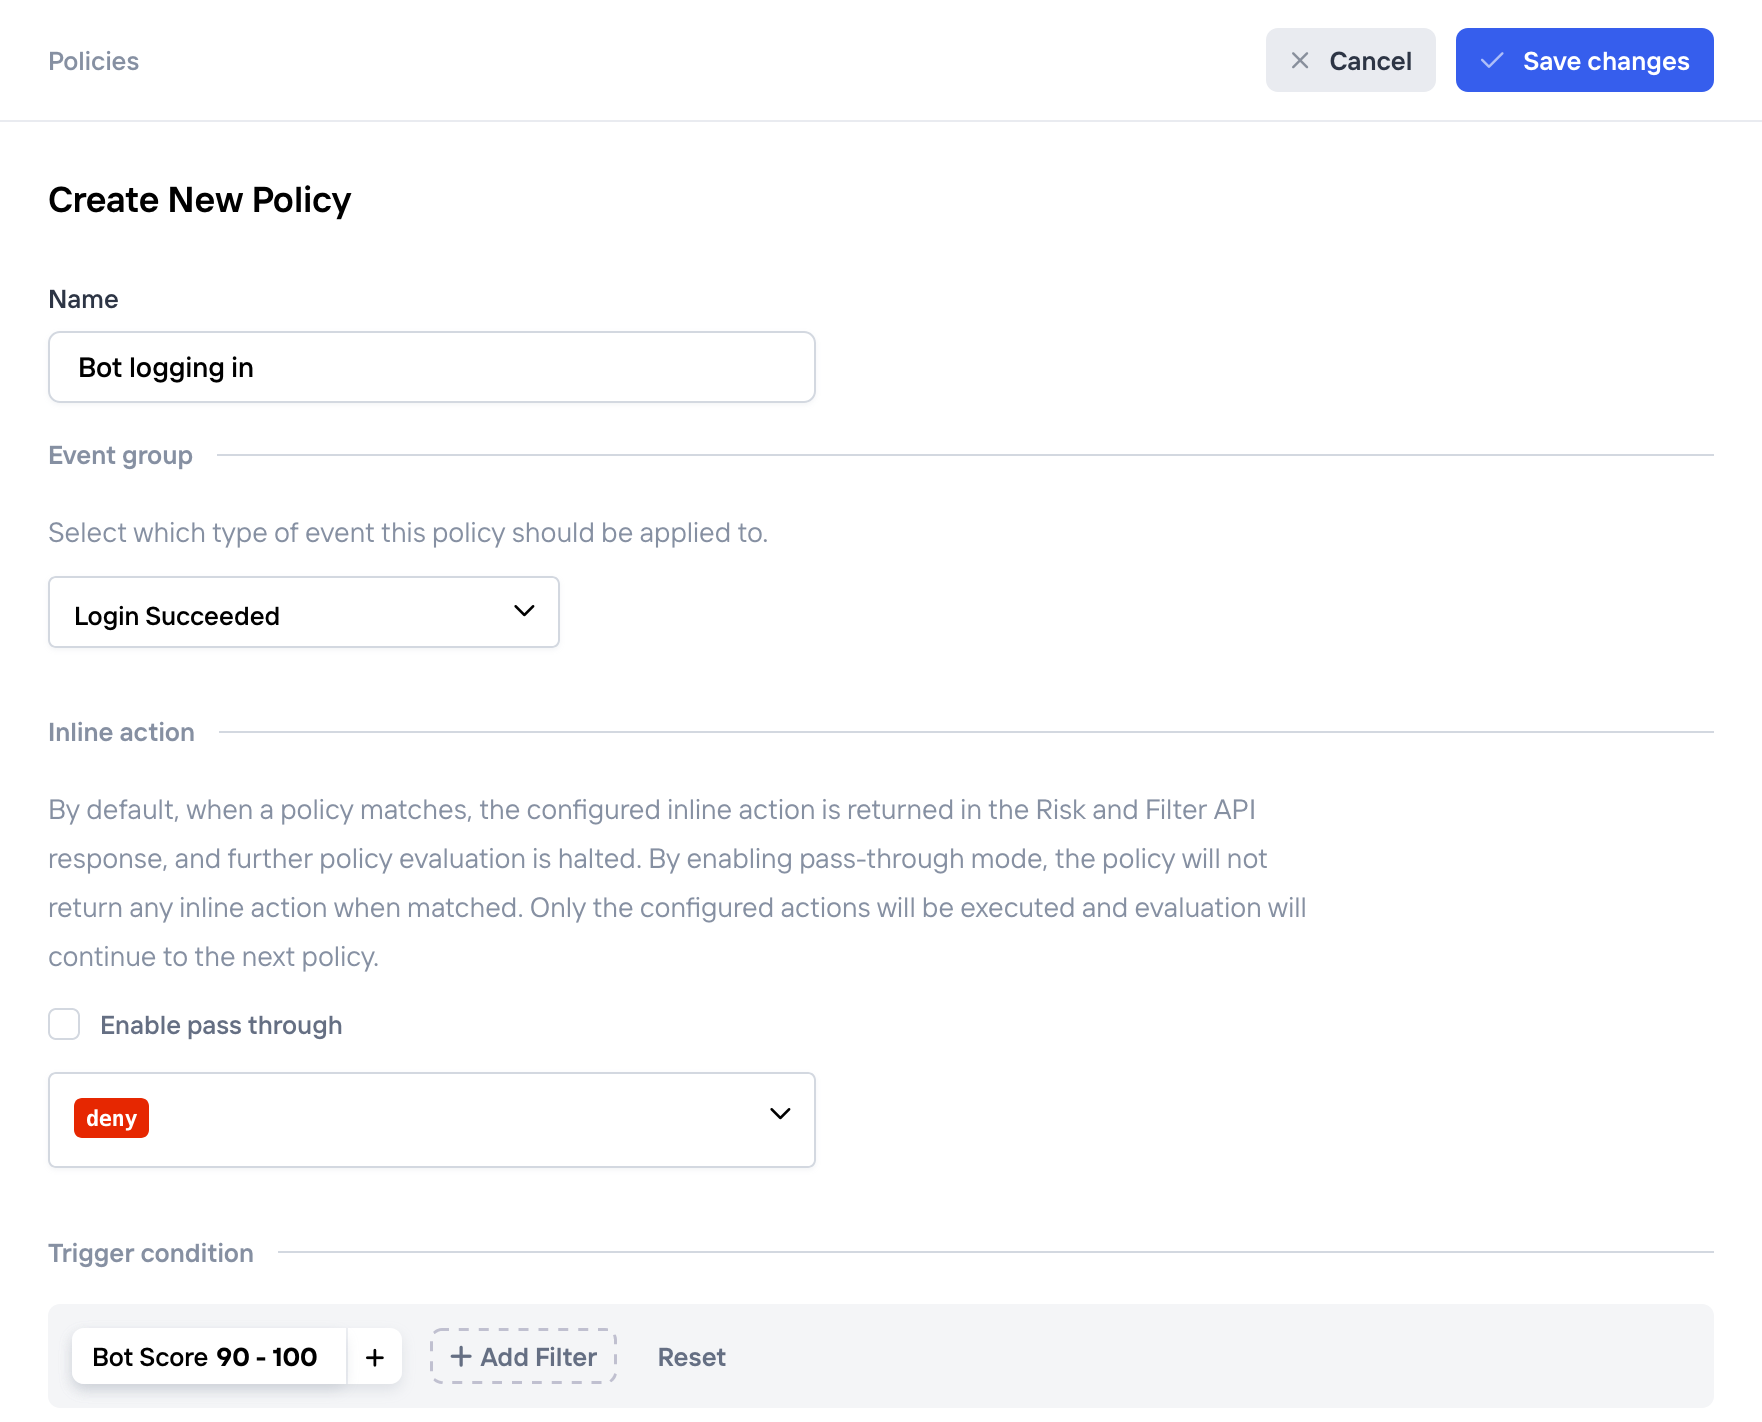
New policy against bots logging in
7.2: Challenge suspicious users (optional)
When to challenge your users?Asking users to prove they have legitimate interest in your business is, well, challenging. Sometimes their behavior on your page look very similar to bots (they try to imitate human behavior as much as they can). As a result Castle returns a higher risk score for bots, where a good option might be to present an additional challenge to the user, for example: a 2FA requirement, or an email sent with verification code.
- Handle the challenge response in your backend:
# app.rb
require 'sinatra'
require_relative 'config/castle.rb'

castle = ::Castle::Client.new

post '/login' do
  # Your code: check for existence and login the user
  user = login_user(request)

  # Successful login: Castle Risk API call
  begin
    result = castle.risk(
      request_token: request.params['castle_request_token'],
      context: ::Castle::Context::Prepare.call(request),
      type: '$login',
      status: '$succeeded',
      user: {
        id: user.id.to_s,
      }
    )

    # Handle "deny" responses
    if result[:policy][:action] == 'deny'
      return [400, 'Invalid username and/or password']
    # Handle "challenge" responses
    elsif result[:policy][:action] == 'challenge'
      # Tell your frontend to handle a challenge before you actually log in the user
      return [200, 'challenge']
    end
  rescue ::Castle::InvalidRequestTokenError
    # Invalid request token is very likely a bad actor bypassing fingerprinting
    return [400, 'Invalid username and/or password']
  rescue ::Castle::Error => e
    # Allow the attempt - most likely a server or timeout error
  end

  return [200, { 'Set-Cookie': user.cookie }, 'Welcome to the app!']
rescue InvalidPasswordError
  # ... clipped for brevity ...
end
// Example uses Symfony 5.4 or newer and PHP 8 or newer
// src/Controller/LoginController.php
namespace App\Controller;
use Symfony\Component\HttpFoundation\Request;
use Symfony\Component\HttpFoundation\Response;
use Symfony\Component\HttpKernel\Exception\BadRequestHttpException;
use Symfony\Component\Routing\Annotation\Route;
class LoginController
{
#[Route('/login', name: 'login', method: 'POST')]
public function login(Request $request): Response
{
try {
$user = $this->login($request);
// Successful login: Castle Risk API call
try {
$result = \Castle::risk([
'request_token' => $request->get('castle_request_token'),
'context' => \Castle_RequestContext::extract(),
'type' => '$login',
'status' => '$succeeded',
'user' => [
'id' => $user->id->toString(),
]
]);
if ($result->policy['action'] == 'deny') {
// Handle "deny" actions
throw new BadRequestHttpException('Invalid username and/or password');
} else if ($result->policy['action'] == 'challenge') {
// Handle "challenge" actions
return new Response('challenge');
}
} catch(\Castle_InvalidRequestTokenError) {
// Invalid request token is very likely a bad actor bypassing fingerprinting
throw new BadRequestHttpException('Invalid username and/or password');
} catch(\Castle_Error) {
// Allow the attempt - most likely a server or timeout error
}
// Continue logging in the user
$response = new Response();
$response->headers->set('Set-Cookie', $user->cookie);
return $respone;
} catch(InvalidPasswordException) {
// ... clipped for brevity...
}
}
}// Express.js
import { APIError, ContextPrepareService, InvalidRequestTokenError } from '@castleio/sdk';
import { castle } from 'config/castle.js';
app.post('/login', (req, res) => {
try {
// Your code: check for existence and login the user
const user = login_user(req);
try {
const result = castle.risk({
request_token: req.body['castle_request_token'],
context: ContextPrepareService.call(req, {}, castle.configuration),
type: '$login',
status: '$succeeded',
user: {
id: user.id.toString(),
},
});
// Handle "deny" actions
if (result.policy.action === 'deny') {
res.status(400).send('Invalid username and/or password');
return;
}
// Handle "challenge" actions
if (result.policy.action === 'challenge') {
res.send('challenge');
return;
}
} catch (e) {
if (e instanceof InvalidRequestTokenError) {
// Invalid request token is very likely a bad actor bypassing fingerprinting
res.status(400).send('Invalid username and/or password');
return;
} else if (e instanceof APIError) {
// Allow attempt. Data missing or invalid, or a server or timeout error
}
}
res.cookie(user.cookie).end();
return;
} catch(e) {
if (e typeof InvalidPasswordException) {
// ... clipped for brevity ...
}
}
});# Flask 3.0
from flask import request, make_response
from castle import CastleError, Client, ContextPrepare, InvalidRequestTokenError
castle_client = Client()
@app.route('/login', methods=['POST'])
def login():
try:
# Your code: check for existence and login the user
user = login_user(request)
# Successful login: Castle Risk API call
try:
result = castle_client.risk({
'request_token': request.form['castle_request_token'],
'context': ContextPrepare.call(request),
'type': '$login',
'status': '$succeeded',
'user': {
'id': str(user.id)
}
})
if result.policy.action == 'deny':
return 'Invalid username and/or password', 400
if result.policy.action == 'challenge':
return 'challenge'
except InvalidRequestTokenError:
# Invalid request token is very likely a bad actor bypassing fingerprinting
return 'Invalid username and/or password', 400
except CastleError as e:
# Allow the attempt - most likely a server or timeout error
# Proceed with setting the cookie and persisting user session
response = make_response()
response.set_cookie('session', user.cookie)
return response
except InvalidPasswordError:
# ... clipped for brevity ...package com.your.app;
// ... existing imports and UserDTO clipped for brevity ...
@Controller
public class AppController {
private Castle castle;
// ... registration method clipped for brevity ...
@PostMapping("/login")
public ResponseEntity<String> login(HttpServletRequest request, HttpServletResponse response, @Valid UserDto user) {
try {
// Your code: check for existence and login the user
User userEntity = this.loginUser(user);
// Successful login: Castle Risk API call
try {
CastleContextBuilder context = this.castle.contextBuilder().fromHttpServletRequest(request);
CastleResponse result = this.castle.client().risk(
ImmutableMap.builder()
.put(Castle.KEY_REQUEST_TOKEN, request.getParameter("castle_request_token"))
.put(
Castle.KEY_CONTEXT,
ImmutableMap.builder()
.put(Castle.KEY_IP, context.getIp())
.put(Castle.KEY_HEADERS, context.getHeaders())
.build()
)
.put("type", "$login")
.put("status", "$succeeded")
.put(
"user",
ImmutableMap.builder()
// This is optional, but will highly improve accuracy
.put("id", userEntity.getId().toString())
.build()
)
.build()
);
// Handle "deny" responses
if ("deny".equals(result.json().getAsJsonObject().getAsJsonObject("policy").get("action").getAsString())) {
return new ResponseEntity<String>(
"Invalid username and/or password",
HttpStatus.BAD_REQUEST
);
}
// Handle "challenge" responses
if ("challenge".equals(result.json().getAsJsonObject().getAsJsonObject("policy").get("action").getAsString())) {
return new ResponseEntity<String>(
"challenge",
HttpStatus.OK
);
}
} catch (CastleApiInvalidRequestTokenException requestTokenException) {
// Invalid request token is very likely a bad actor bypassing fingerprinting
return new ResponseEntity<String>(
"Invalid username and/or password",
HttpStatus.BAD_REQUEST
);
} catch (CastleRuntimeException runtimeException) {
// Allow the attempt - most likely a server or timeout error
}
// Your code: Set the cookie and return user session
return new ResponseEntity<String>('', HttpStatus.OK);
} catch(InvalidPasswordException e {
// ... clipped for brevity ...
}
}
}- Update handling of your login requests and challenge the user:
const form = document.getElementById('login-form');

// Call /login handler asynchronously using Fetch API
form.addEventListener('submit', function (event) {
  event.preventDefault();
  const data = new FormData(event.currentTarget);

  const submit = async () => {
    const token = await castle.createRequestToken();
    data.set('castle_request_token', token);

    const response = await fetch(form.getAttr('action'), {
      method: form.getAttr('method'),
      body: data,
    });
    const result = await response.text();

    if (result === 'challenge') {
      // A simplified challenge as an example, do NOT use in production
      if (!confirm('Are you a bot?')) {
        // The challenge succeeded
        data.set('challenge', 'true');
        submit();
        return;
      }

      alert('You are denied the access');
    }

    alert('You are logged in!');
  };

  submit();

  return false;
});- Go to the policies page in Castle's Dashboard and click Create new policy button.
- Fill in the policy details:
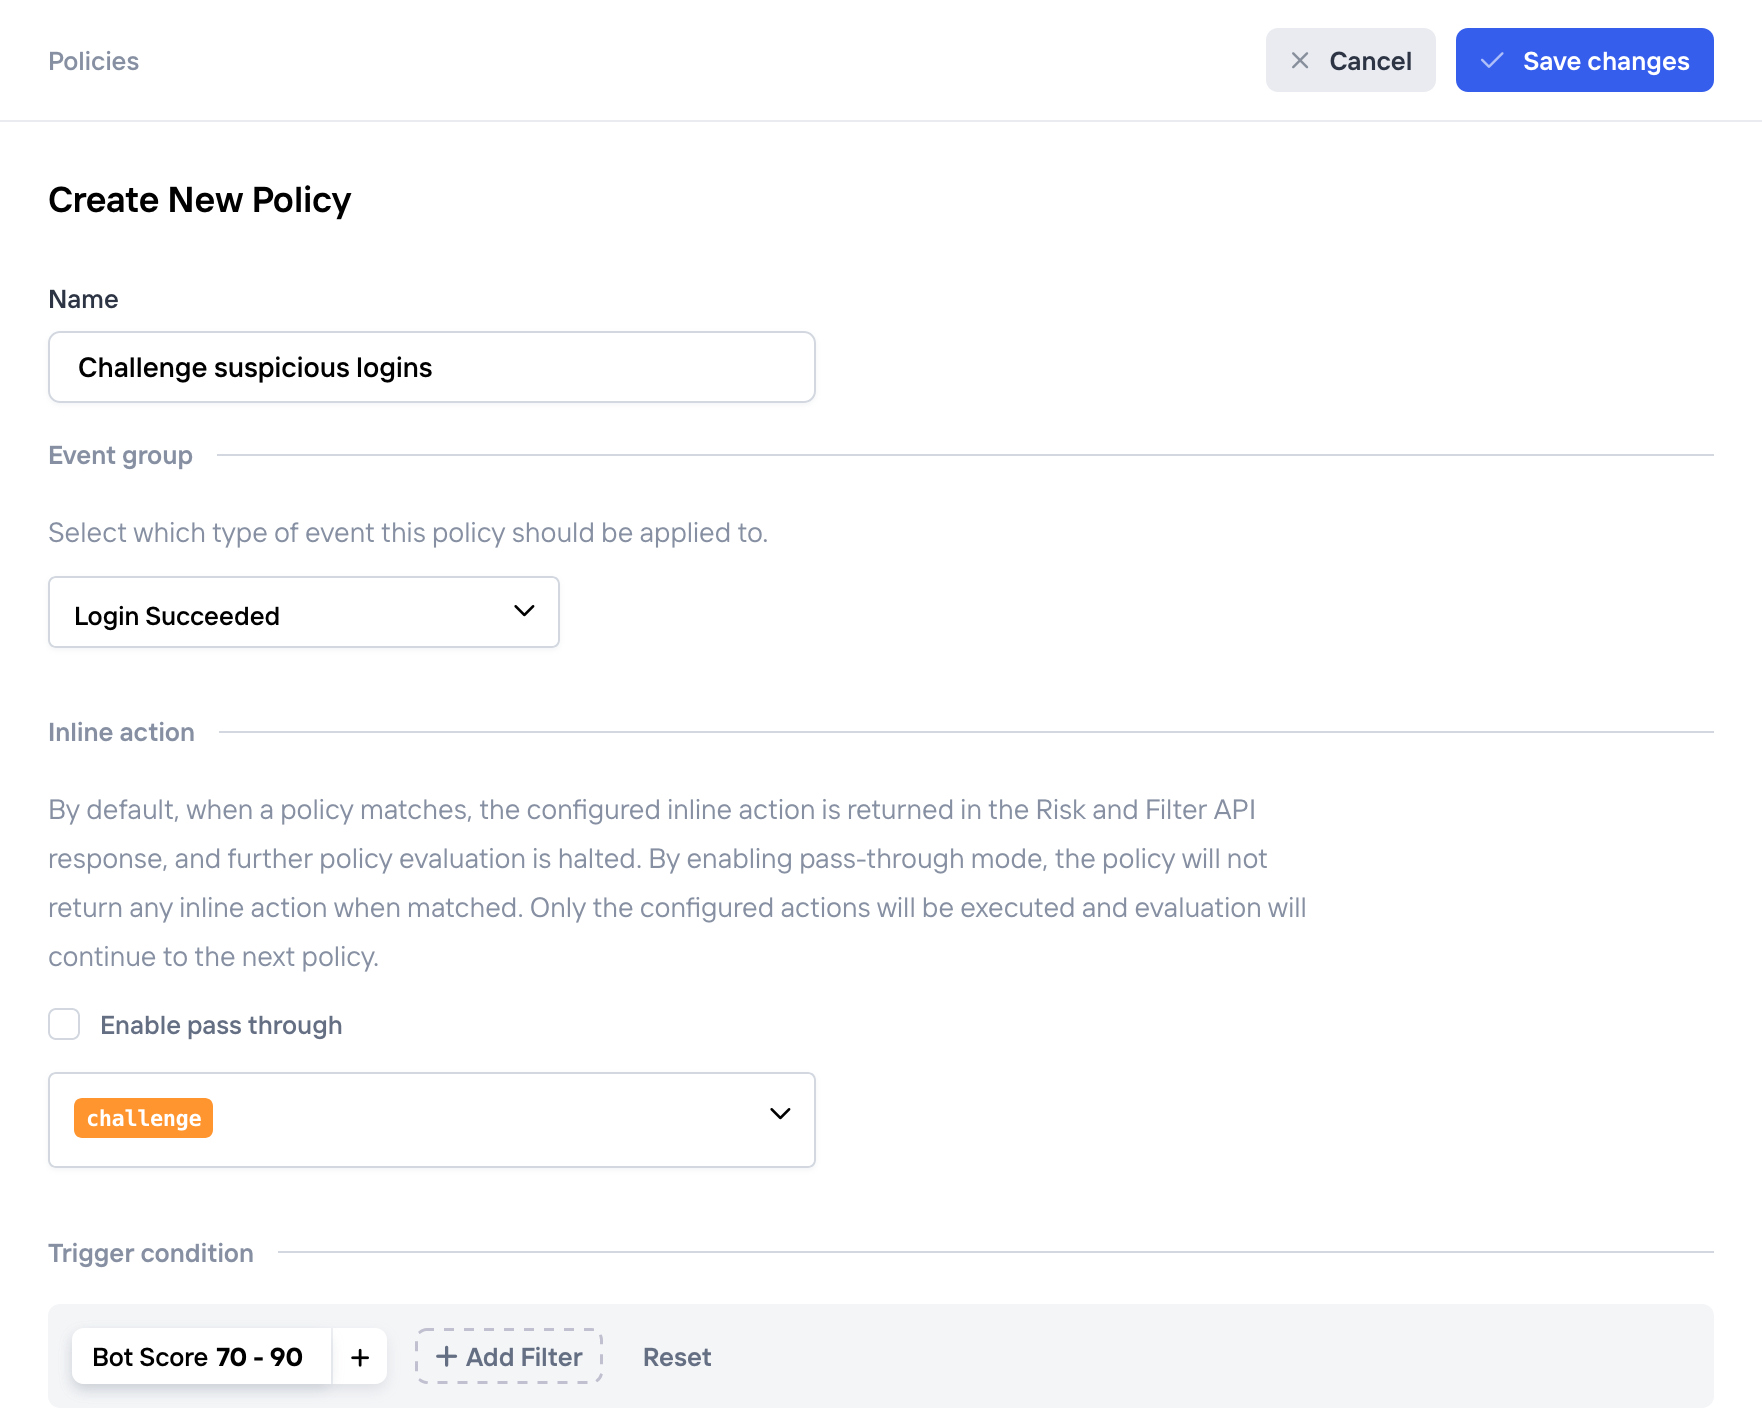
New policy challenging suspicious users
What is a good challenge?It is important to properly design your challenges: they should be easy for a human, but hard for bots. How can you achieve such balance? It is best to tap into different accounts a user might have, for example:
- Send a code to their email address (assuming their email account hasn't been breached),
- Ask for a phone number and send an SMS code (in most countries a number is registered to a real person),
- Ask to confirm logging in with an additional social account login.
We recommend thinking on a challenge that is very natural for your customers, but is hard to do for an automated attack you want to prevent.
Step 8: Test, then activate your policies
As you went through the whole integration process you might have noticed that policies you created are disabled by default. It is a deliberate behavior as it allows you to integrate your app with Castle, but keep learning as the first phase.
After a few days you should open the Dashboard and check how the policies you defined would have acted on your customers. The easiest way to do this is:
-
Open the policies page in Castle's Dashboard.
-
Click a search icon near the policy you are interested in:
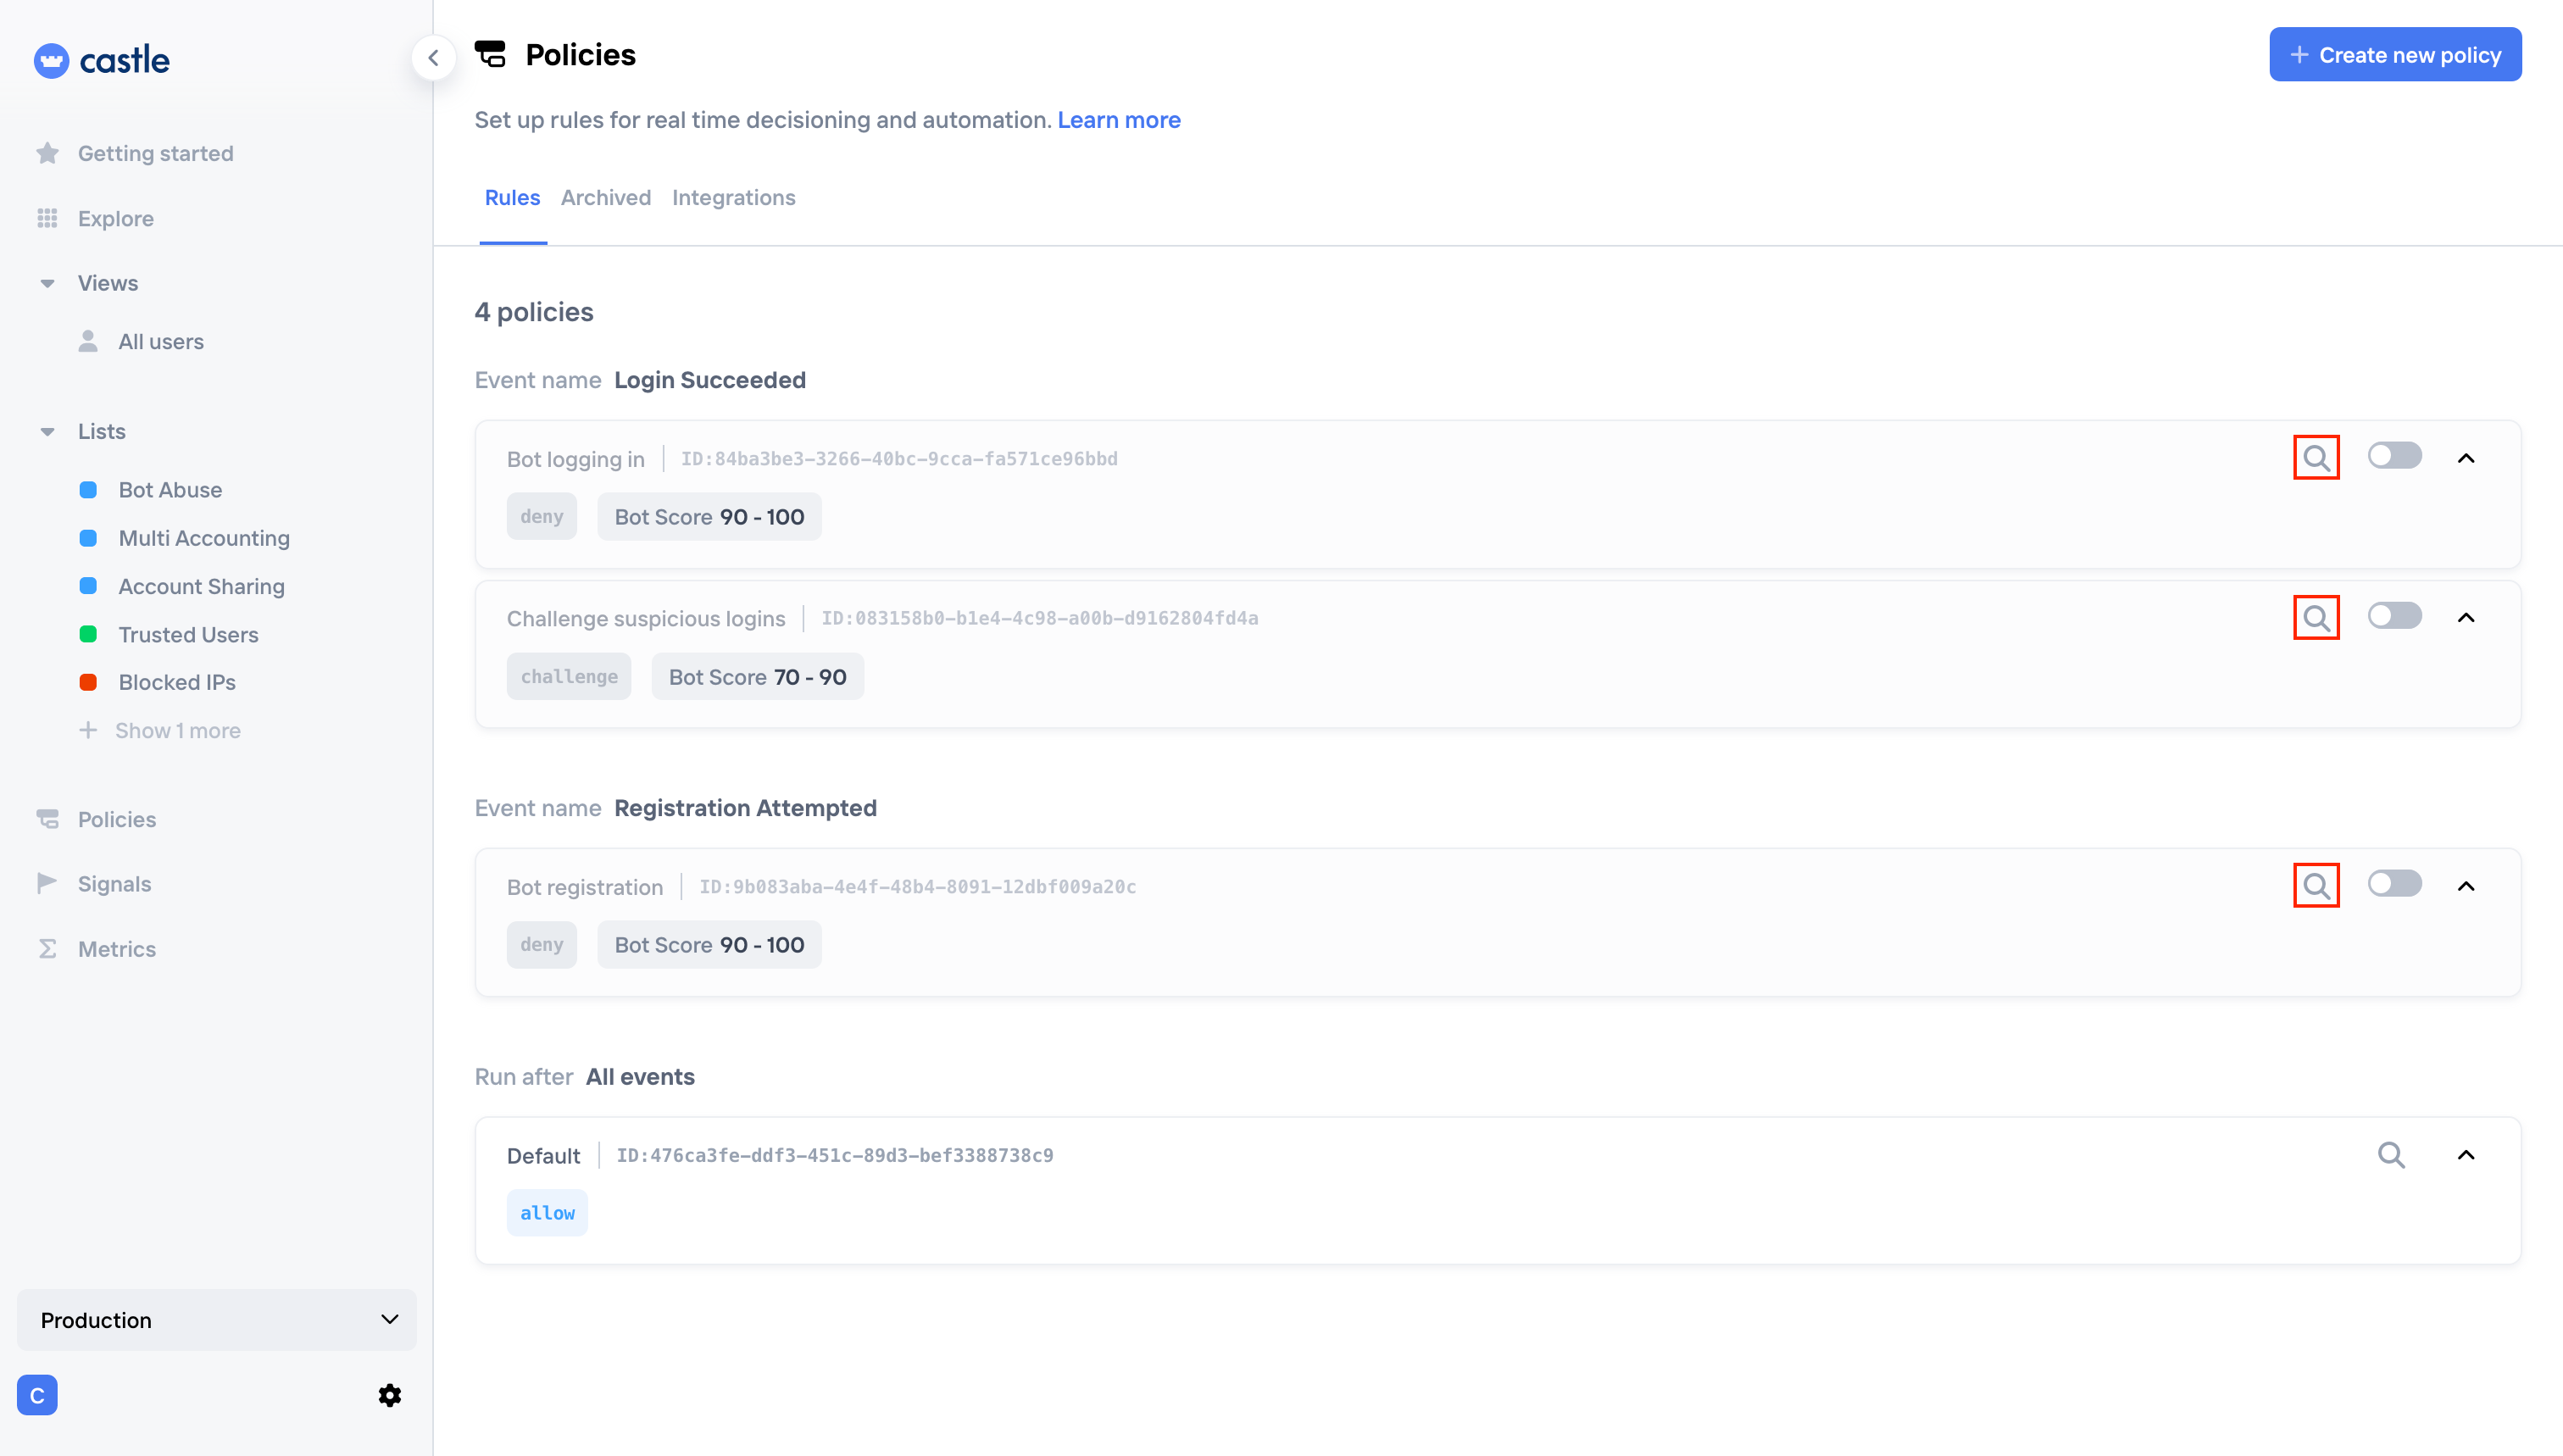
Policies view with disabled policies
-
Check events and users that you sent to Castle that would have been blocked or challenged (depending on the policy action you selected):

Policy events view
-
When you feel that your policies are good - enable them:
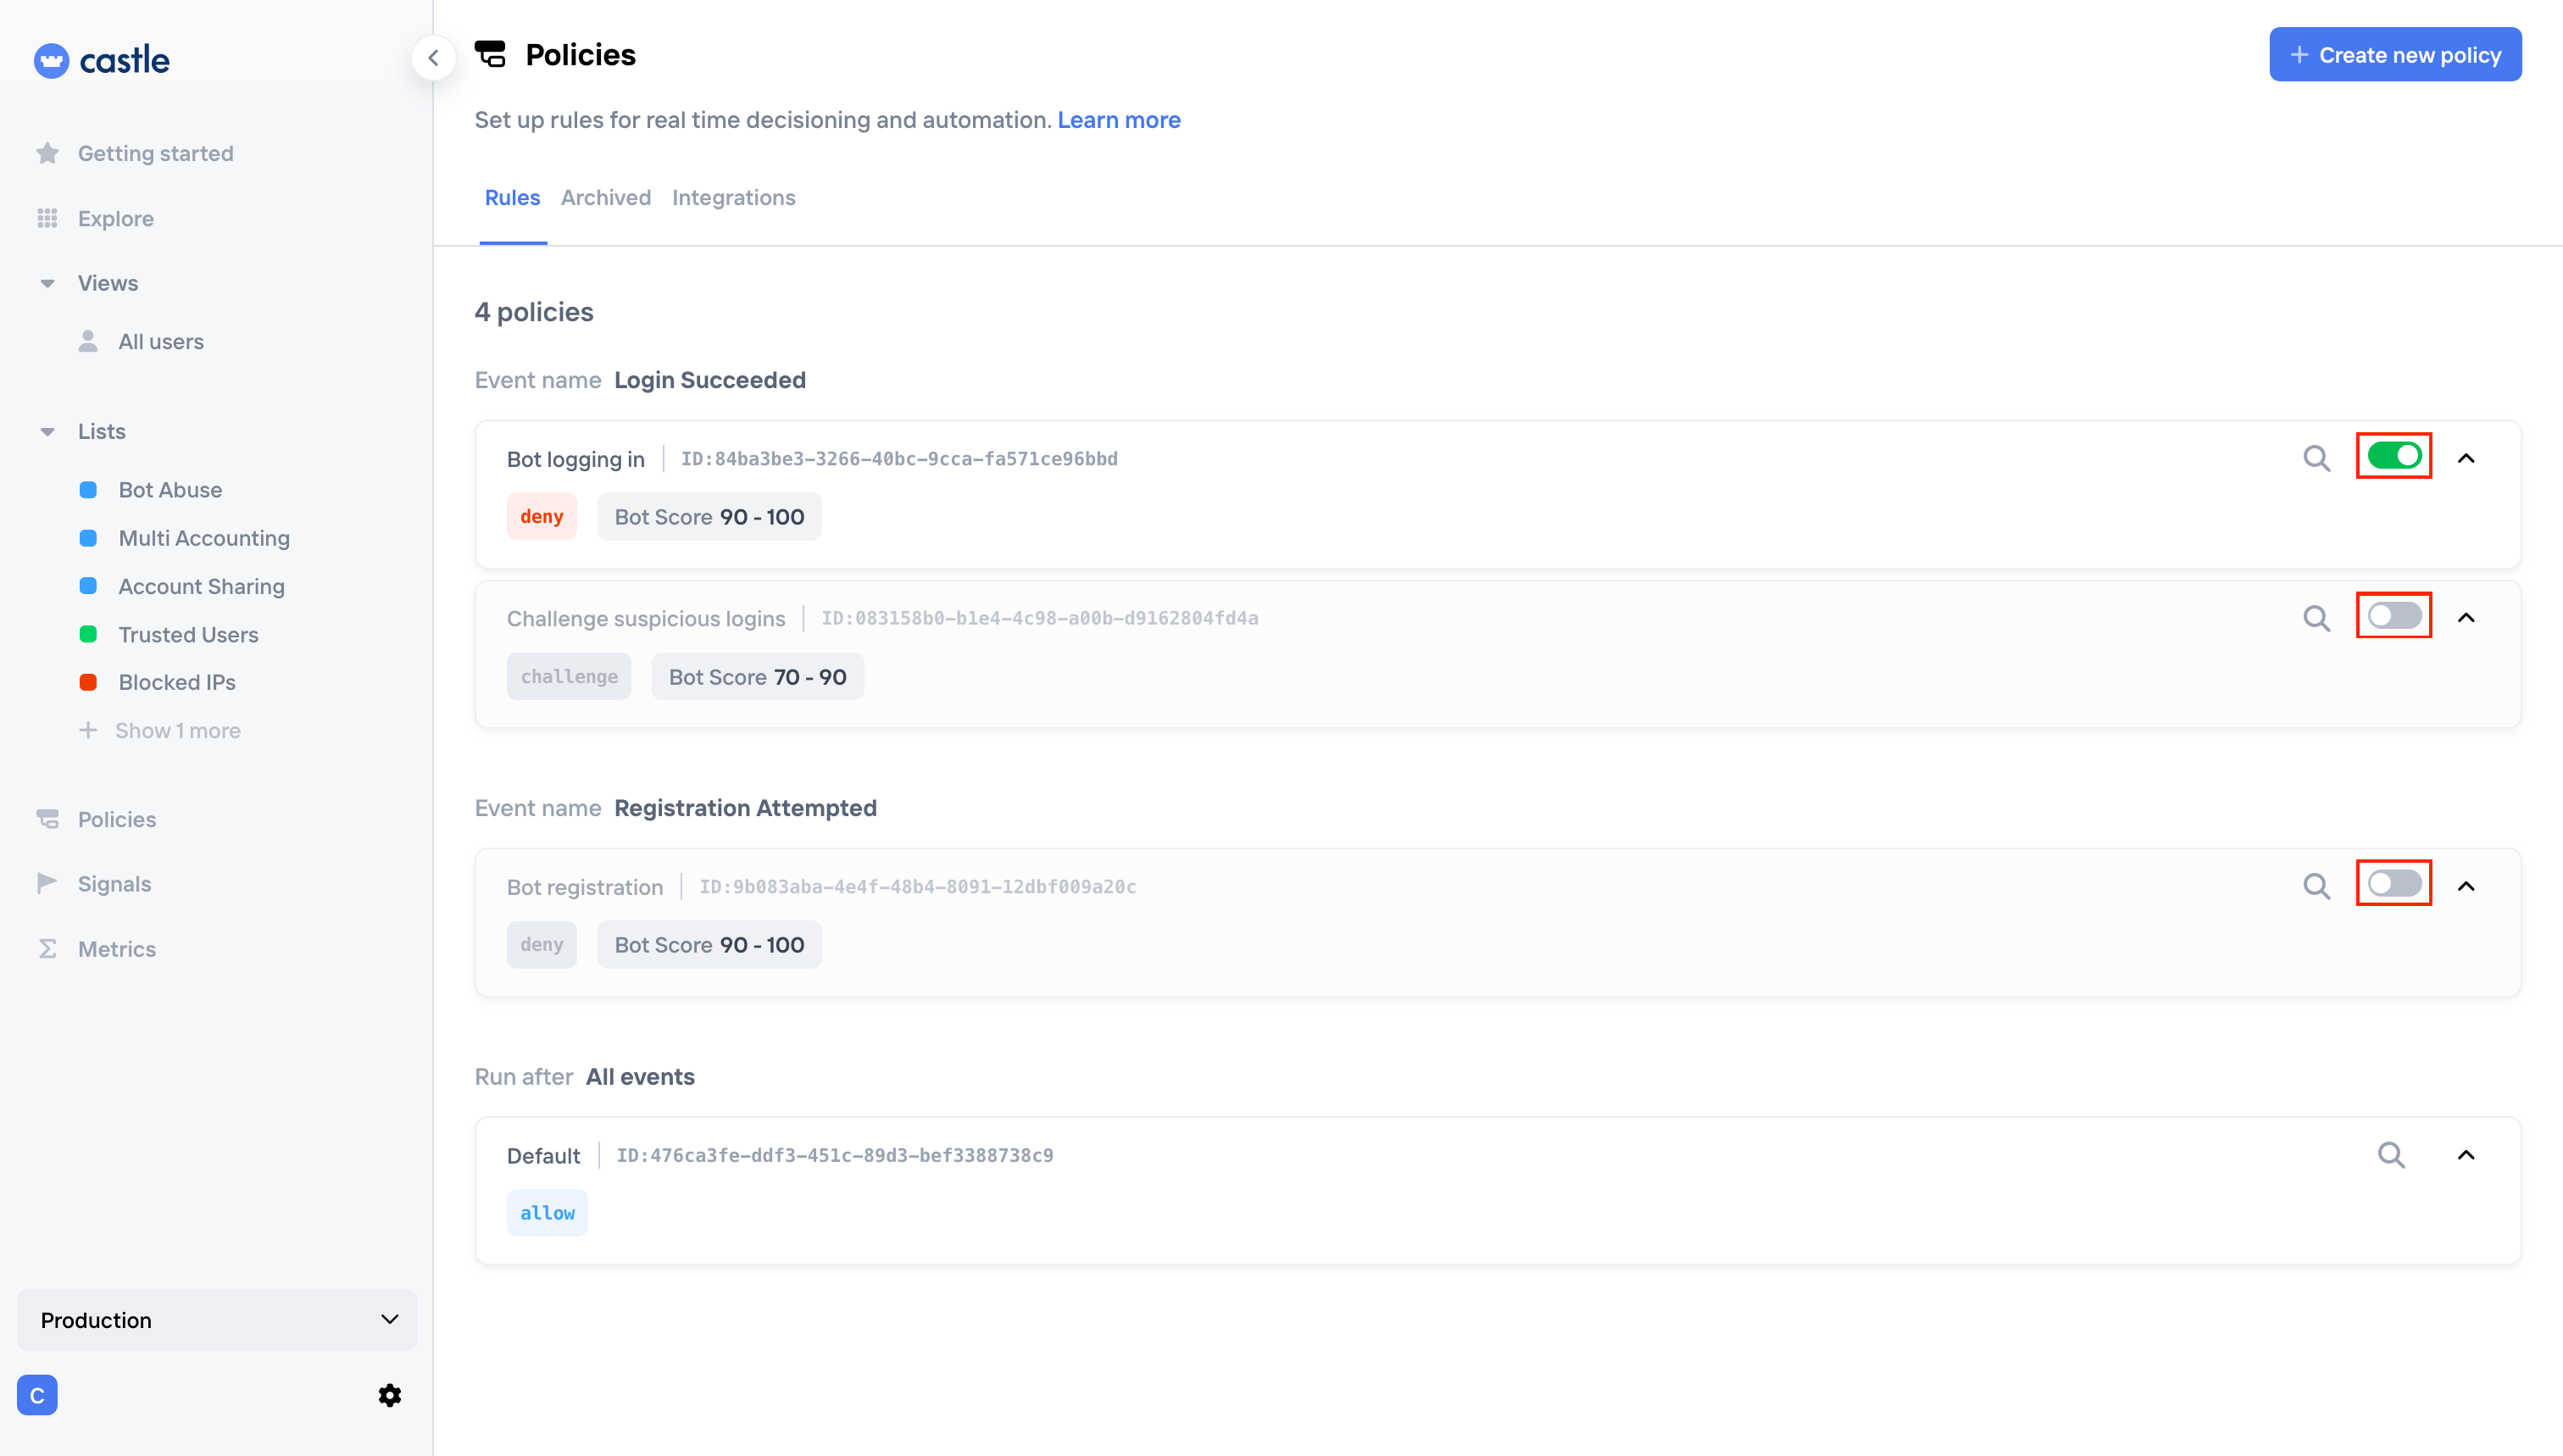
Policies view with enabled and disabled items in the list
-
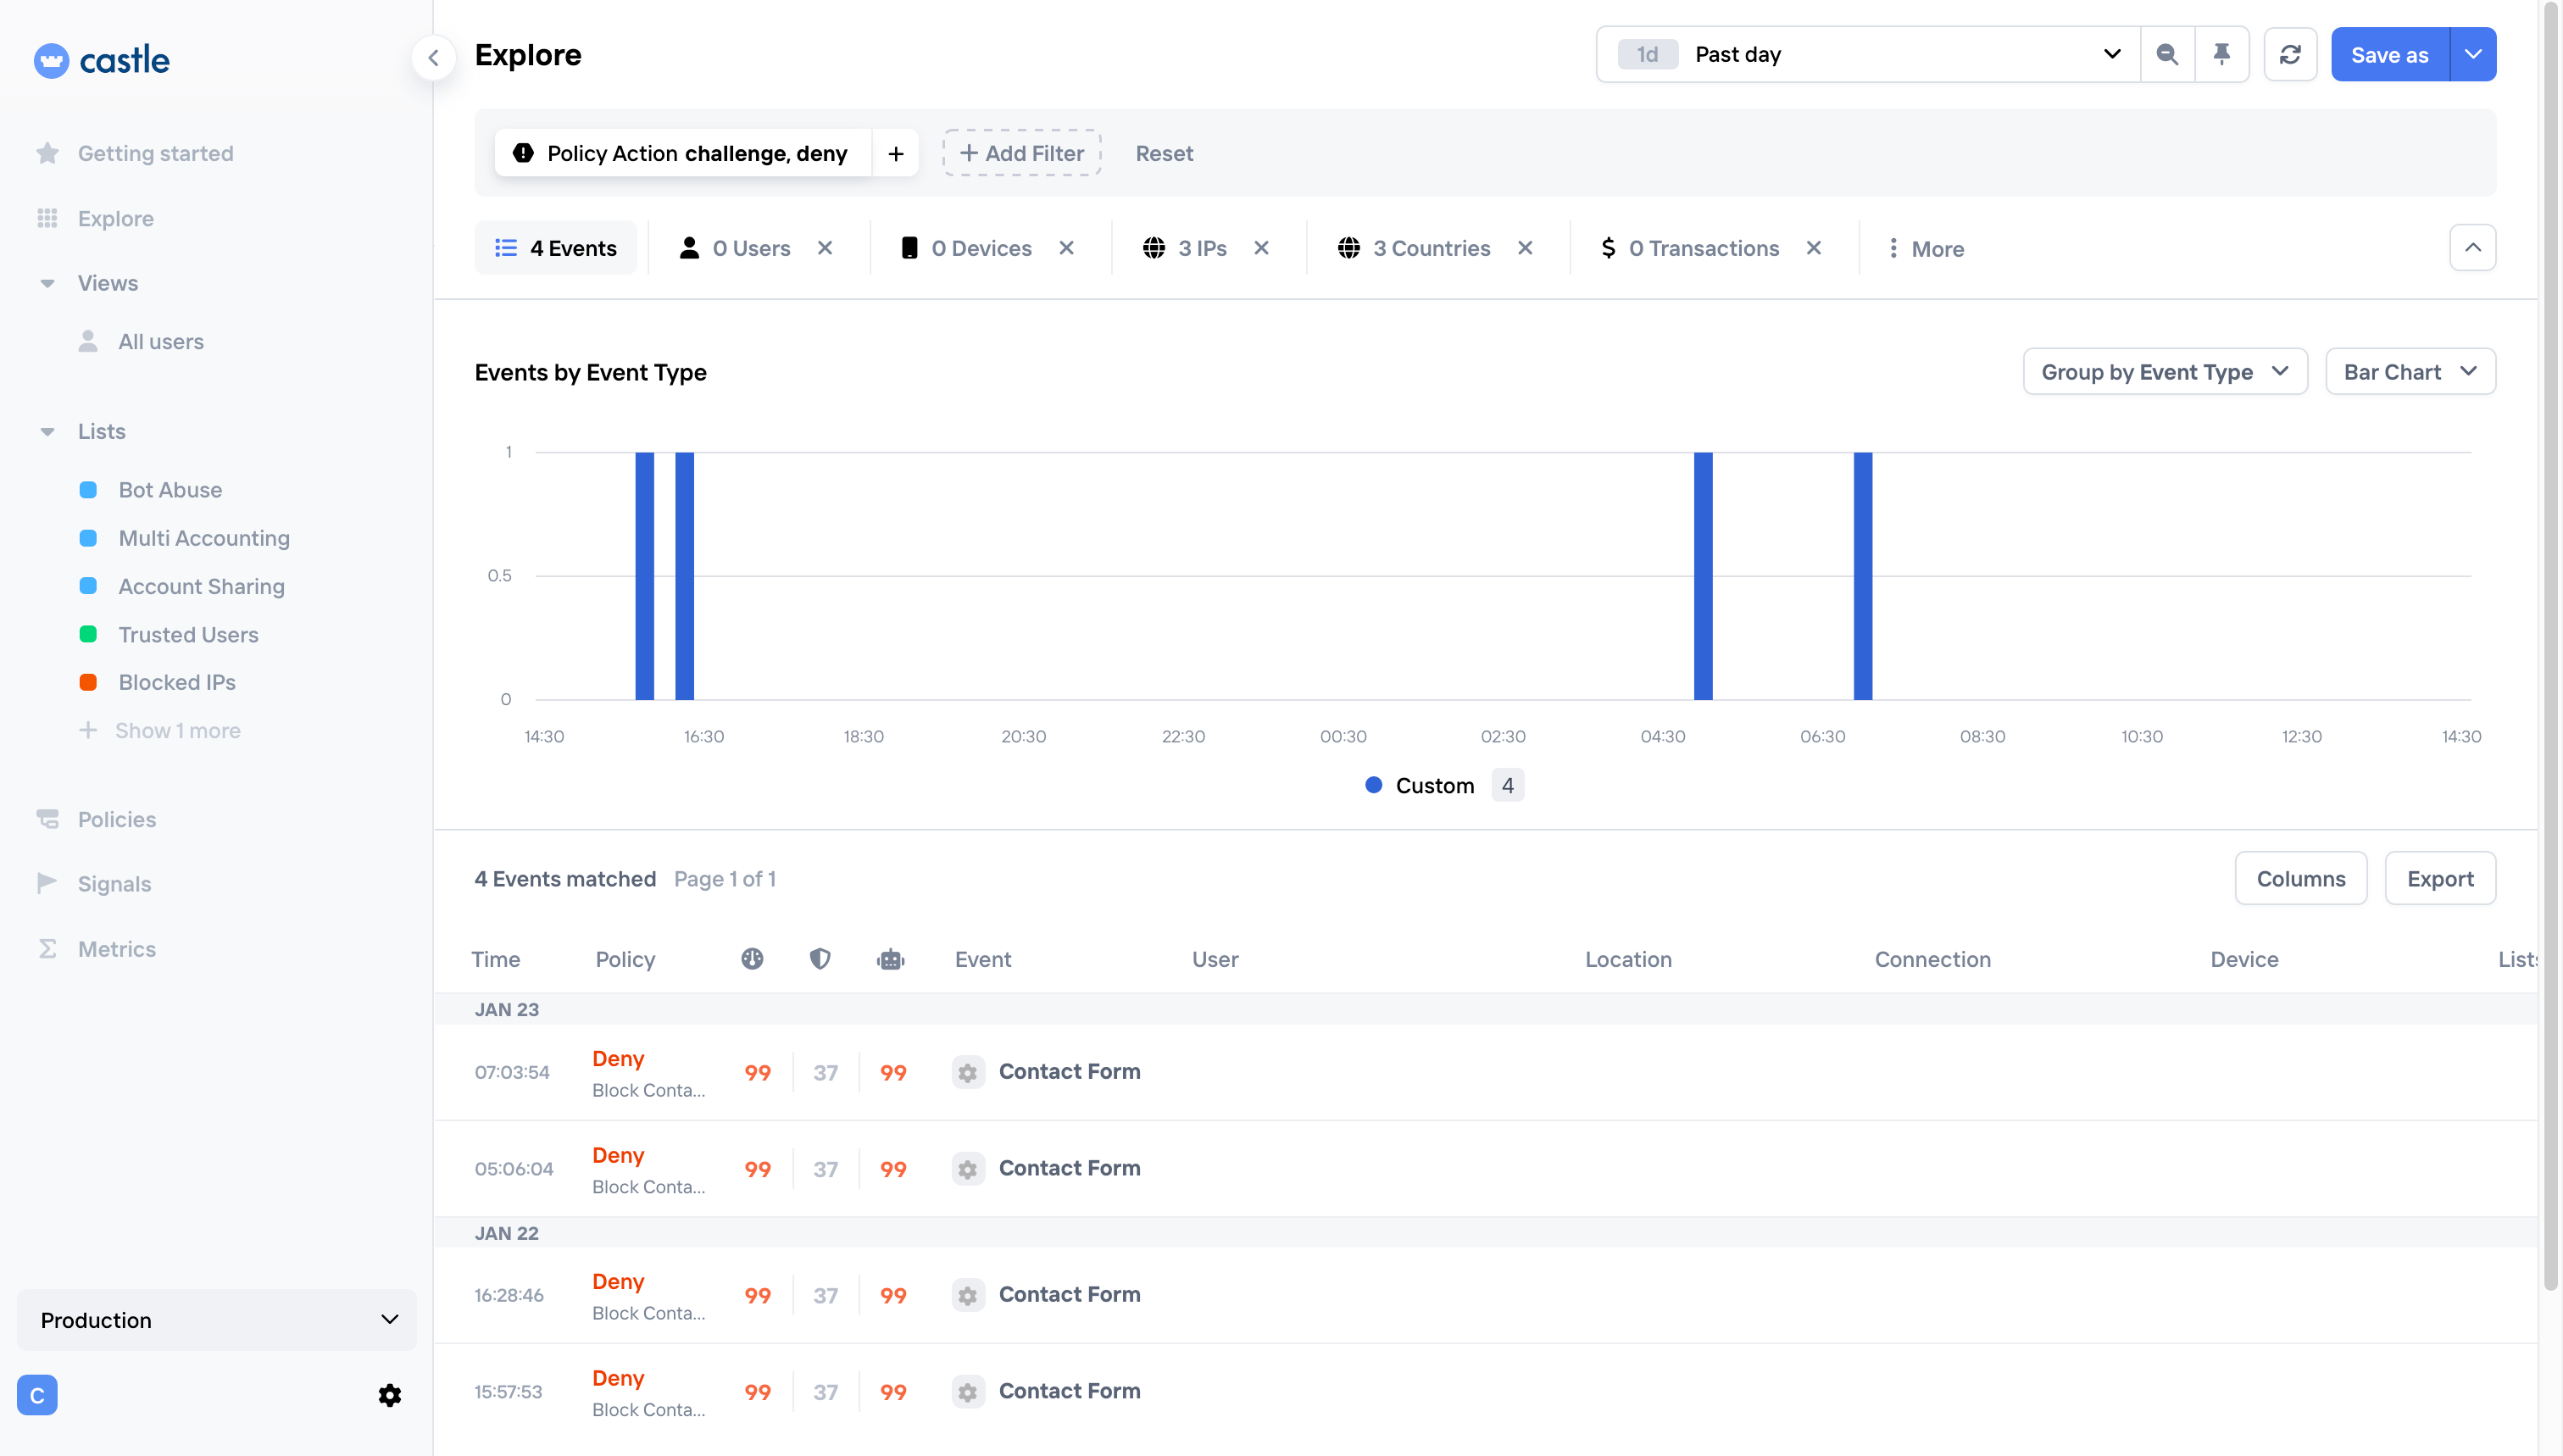
You might start seeing "Deny" responses in your Explore view:
What's next
You're integrated! Events should appear in your Castle Dashboard within seconds.
Next steps:
- Roll out gradually using your feature flag
- Monitor the Dashboard to see blocked bots and suspicious behavior
- Adjust policy thresholds based on real data
- Learn to explore your data to fine-tune policies
Updated 4 months ago
What’s Next
With this integration you are ready to take on more advanced use cases like detecting account sharing or challenging users logging in from new devices or locations. You can also learn how to explore your data to achieve the best results with our dashboard.