Lists
Learn how to effectively create, manage, and utilize Lists in Castle to streamline fraud-related workflows and enhance security.
What you will learn from this guide
This guide will help you understand the concept ofLists:
- What are lists used for?
- How do you create and manage a list?
- How do you utilize a list in a policy?
Before you start
- Ensure you have access to your Castle account with admin privileges.
- Ensure you have followed our Integration Guide for proper setup.
What is a List?
Lists are a fundamental concept in Castle, designed to streamline fraud-related workflows. They have several notable features:
- A list is a collection of entries of the same type, such as User ID, Transaction ID, IP address, or even custom attributes like a product ID in a marketplace. When you create a list in Castle, you must specify the type of items it will contain.
- Lists can be color-coded for easy organization. For example, you might use a red color for lists containing items you wish to block.
- Lists can be integrated with Policies to control actions based on list membership or to automatically add items based on certain conditions.
- Each item added to a list includes an author and an optional comment, providing clarity on who added the item and why.
- Advanced: A list item can include a "secondary field," representing another value from a different field. This is typically used to approve a device for a specific user, requiring both user and device to match when the list is evaluated.
- Advanced Items in a list can have an expiration time, after which they are automatically removed. For example, you could create a dynamic IP block list that bans each IP for 24 hours.
What can I use a List for?
Lists serve two primary functions:
- Blocking or allowing entries that match. For example, you can create an IP block list linked to a policy to deny access whenever a matching IP is detected. This list can also be configured to automatically add IPs based on specific criteria.
- Collecting items for later review. For instance, create a "Transactions for Review" list and add transaction IDs that require further investigation from the Explore view.
Managing Lists and list items
Admin role required!You must have an admin role in the Castle Dashboard to create lists.
Creating a new List
Navigate to the List management page and click "Create List" in the upper right corner. You will be prompted to provide details that define your list configuration:
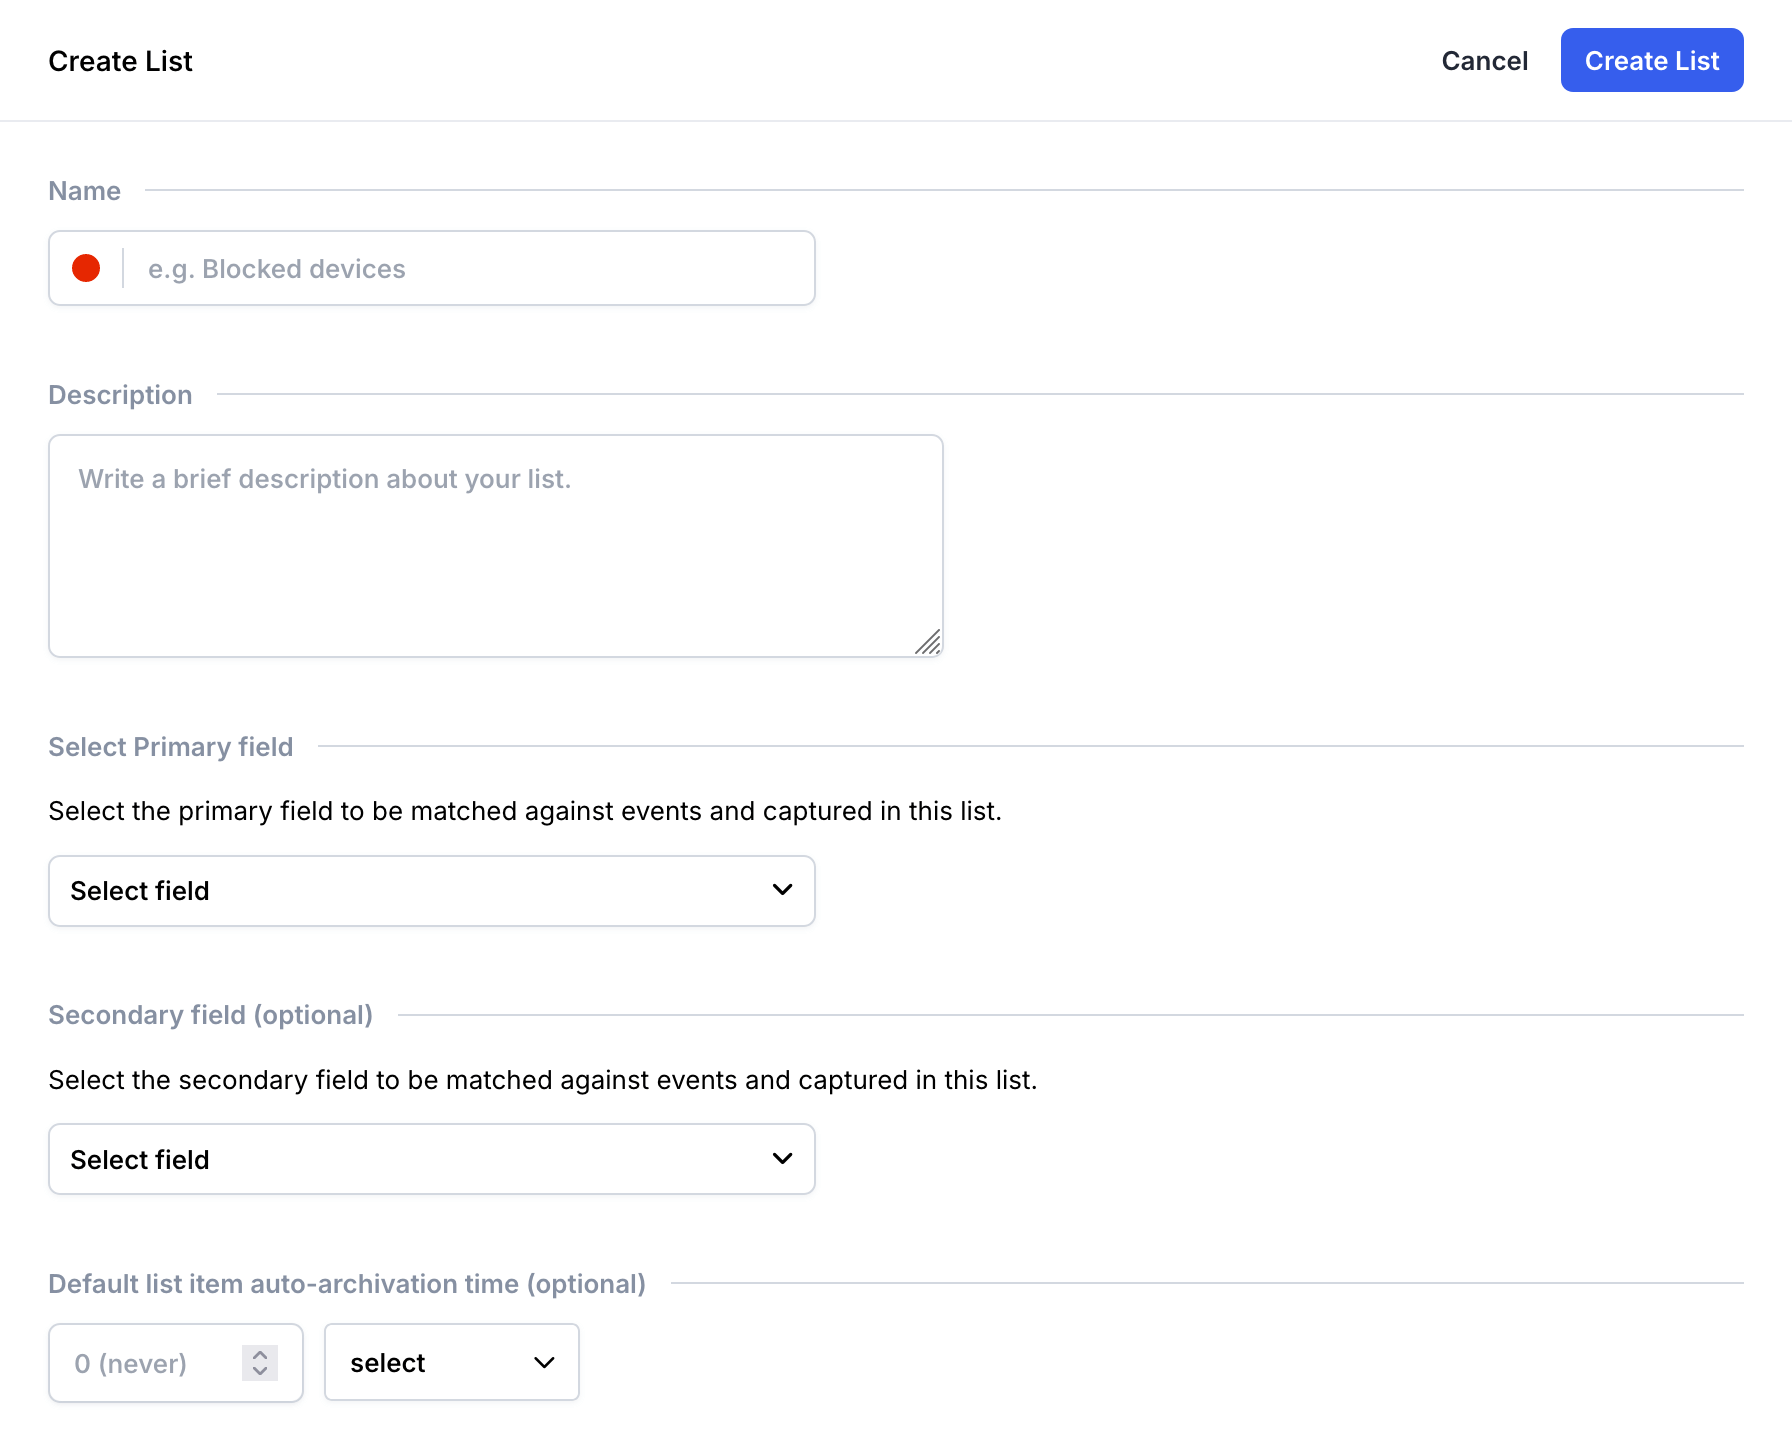
Create List form
Field | Description |
|---|---|
Name |
|
Color |
|
Description |
|
Primary Field |
|
|
|
|
|
Select Primary and Secondary fields carefullyOnce a list is created, the
primaryandsecondaryfields cannot be changed
Auto-archive refreshEach time an item is added, the auto-archive time resets to count from the creation of the most recent entry.
Adding items to lists
Once you've created a list, you can manually add items to it in three ways.
1. Manually, via the list management page
Navigate to the list by clicking its name and select Add to List on the right:
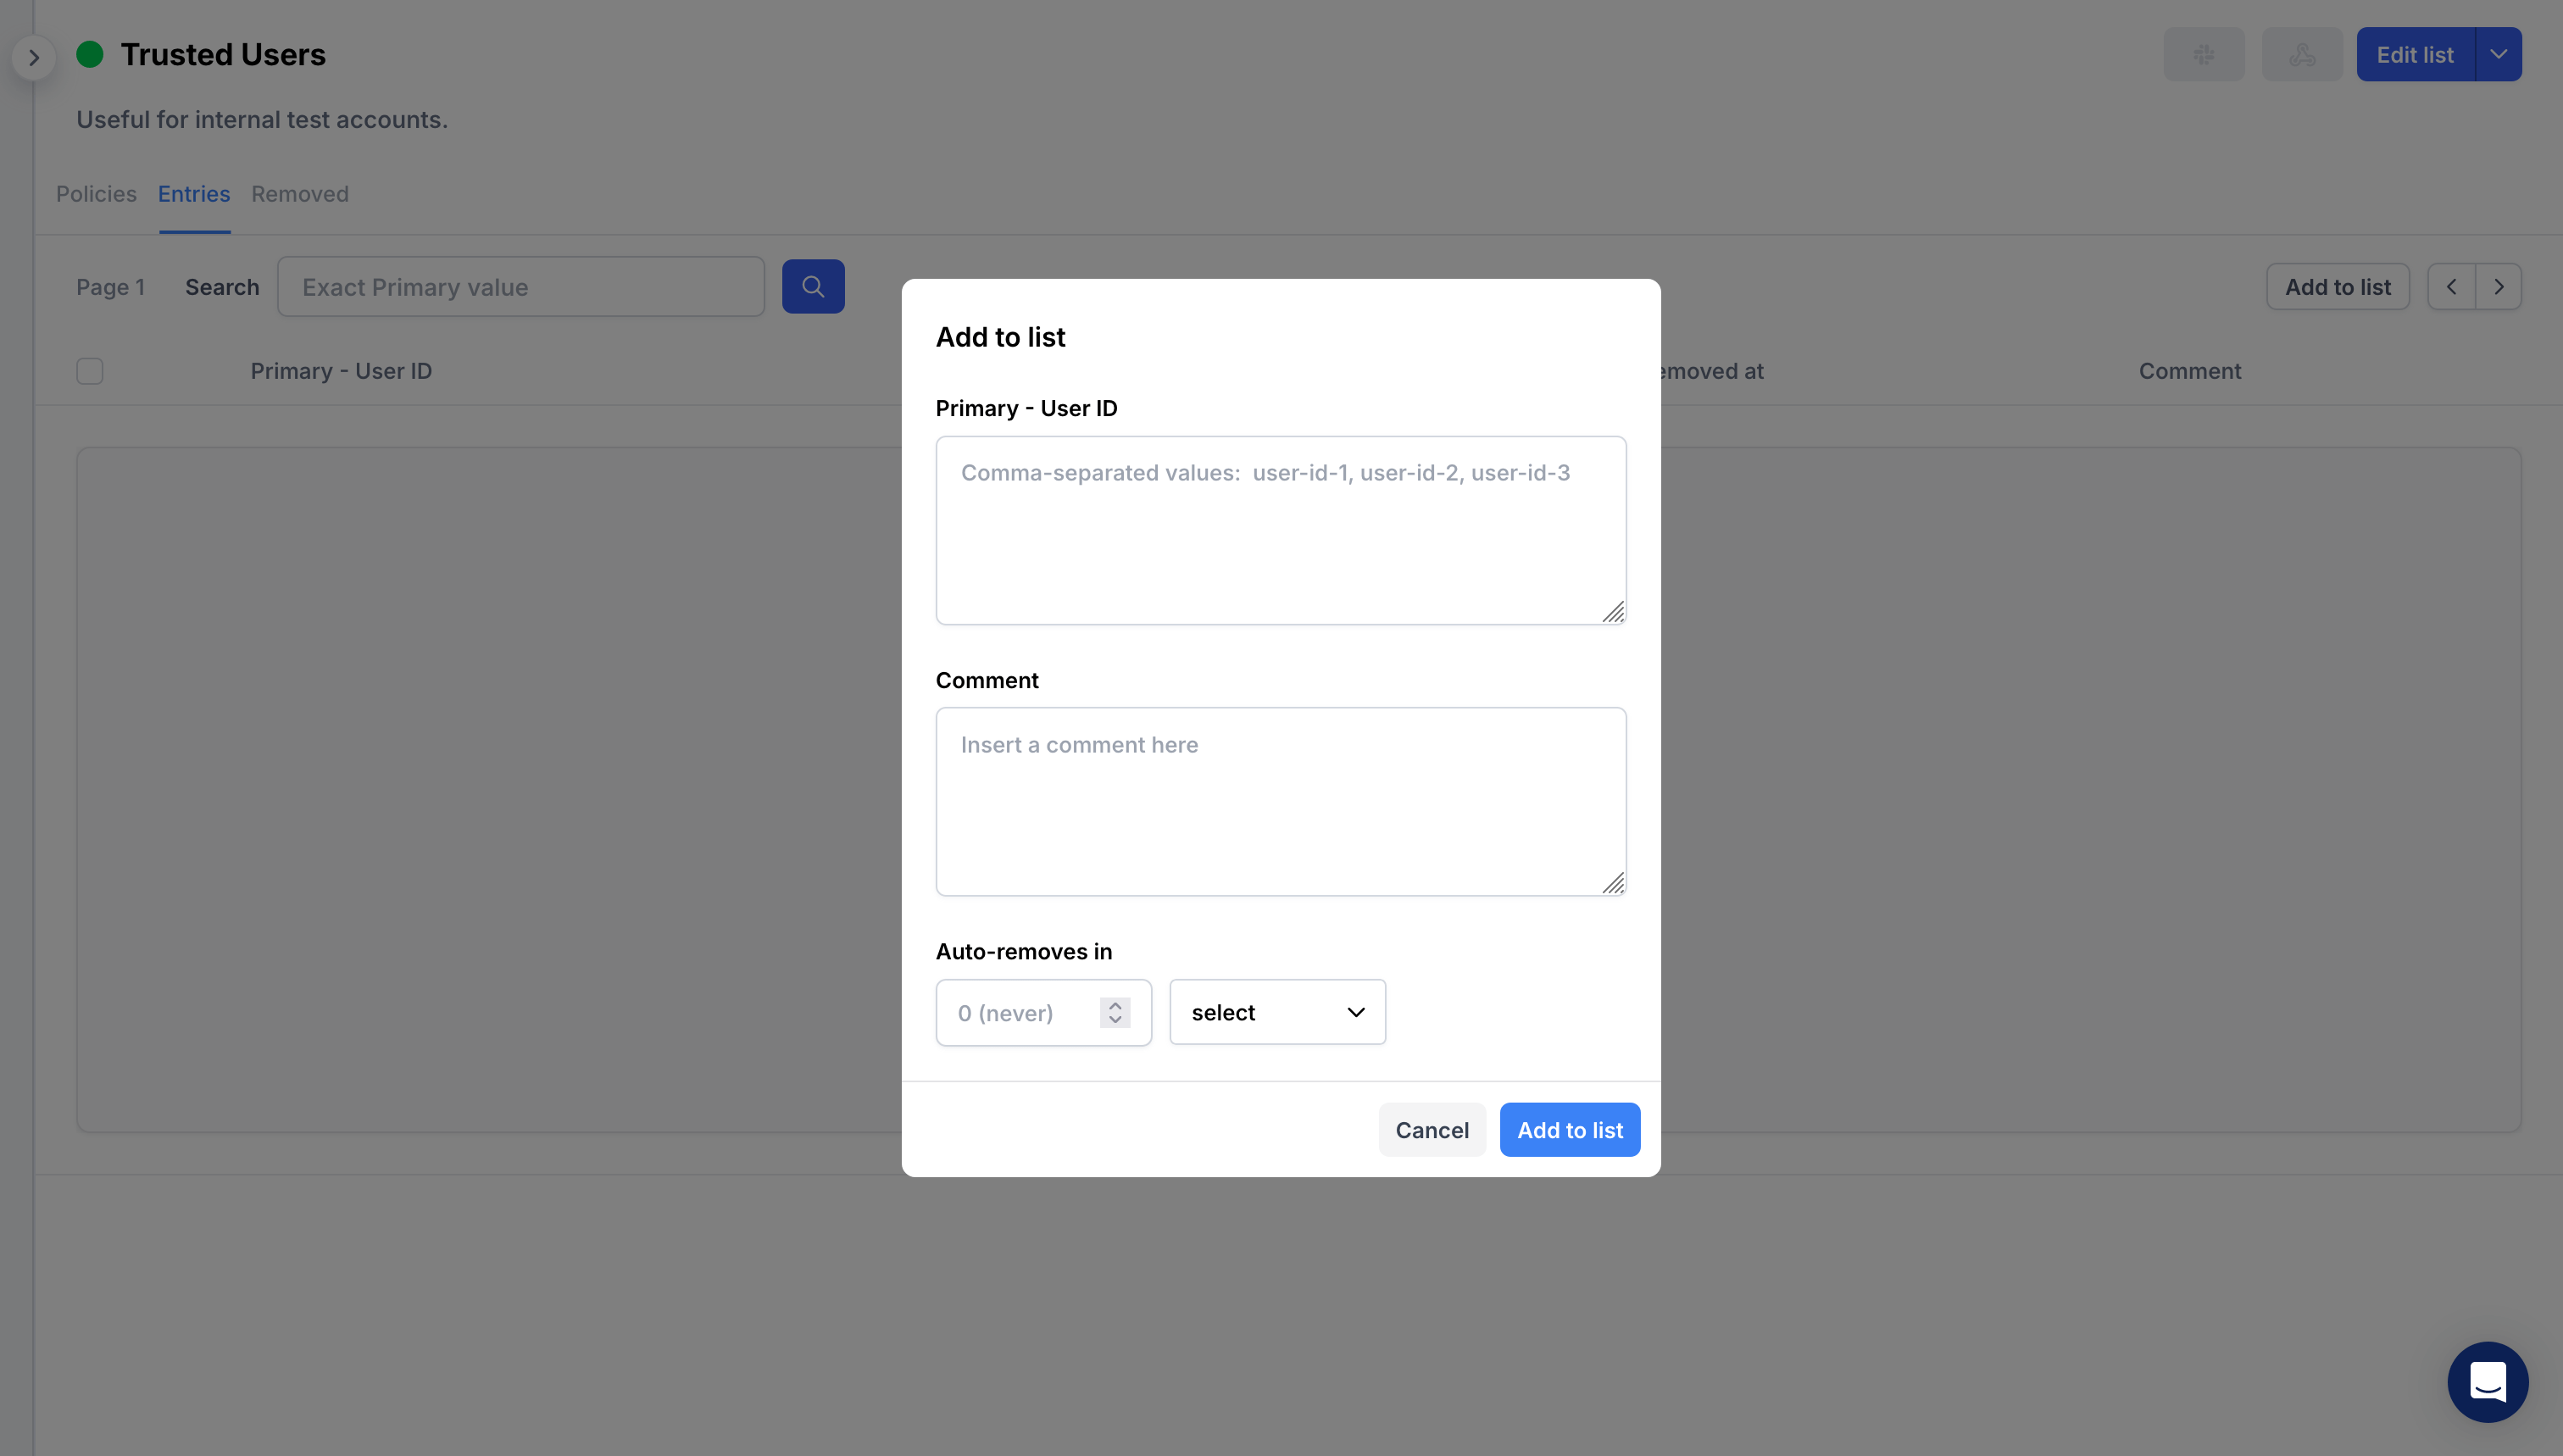
Manually adding items to a list
2. From the Explore view
Open a group-tab corresponding to the List entity, select items, and then click Add to List:
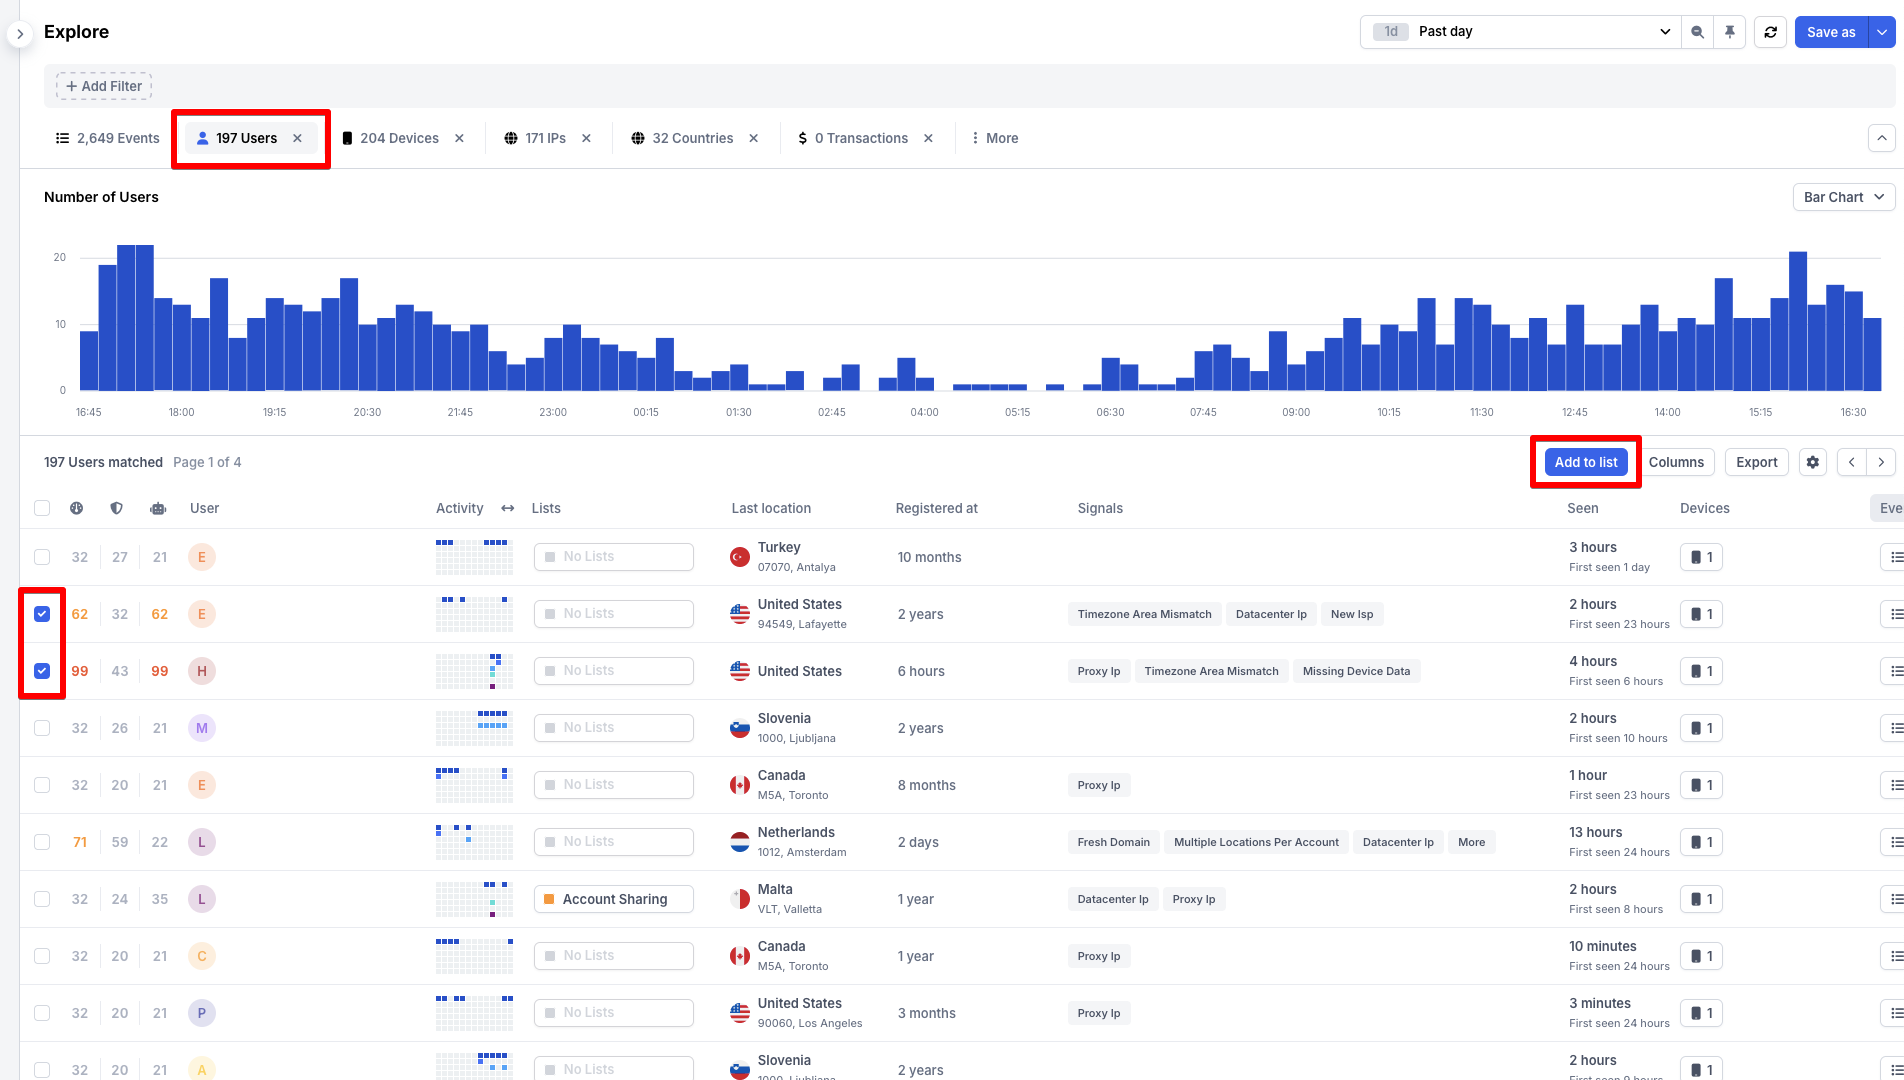
Adding items to a list from Explore view
3. From the User Details view
Add users or devices to corresponding lists by clicking the No Lists button in the top right corner or by selecting the relevant device from the list on the right:

Adding user or device to a list from the User Details
You can also include items in additional lists by clicking on the name of the list in the top right corner:
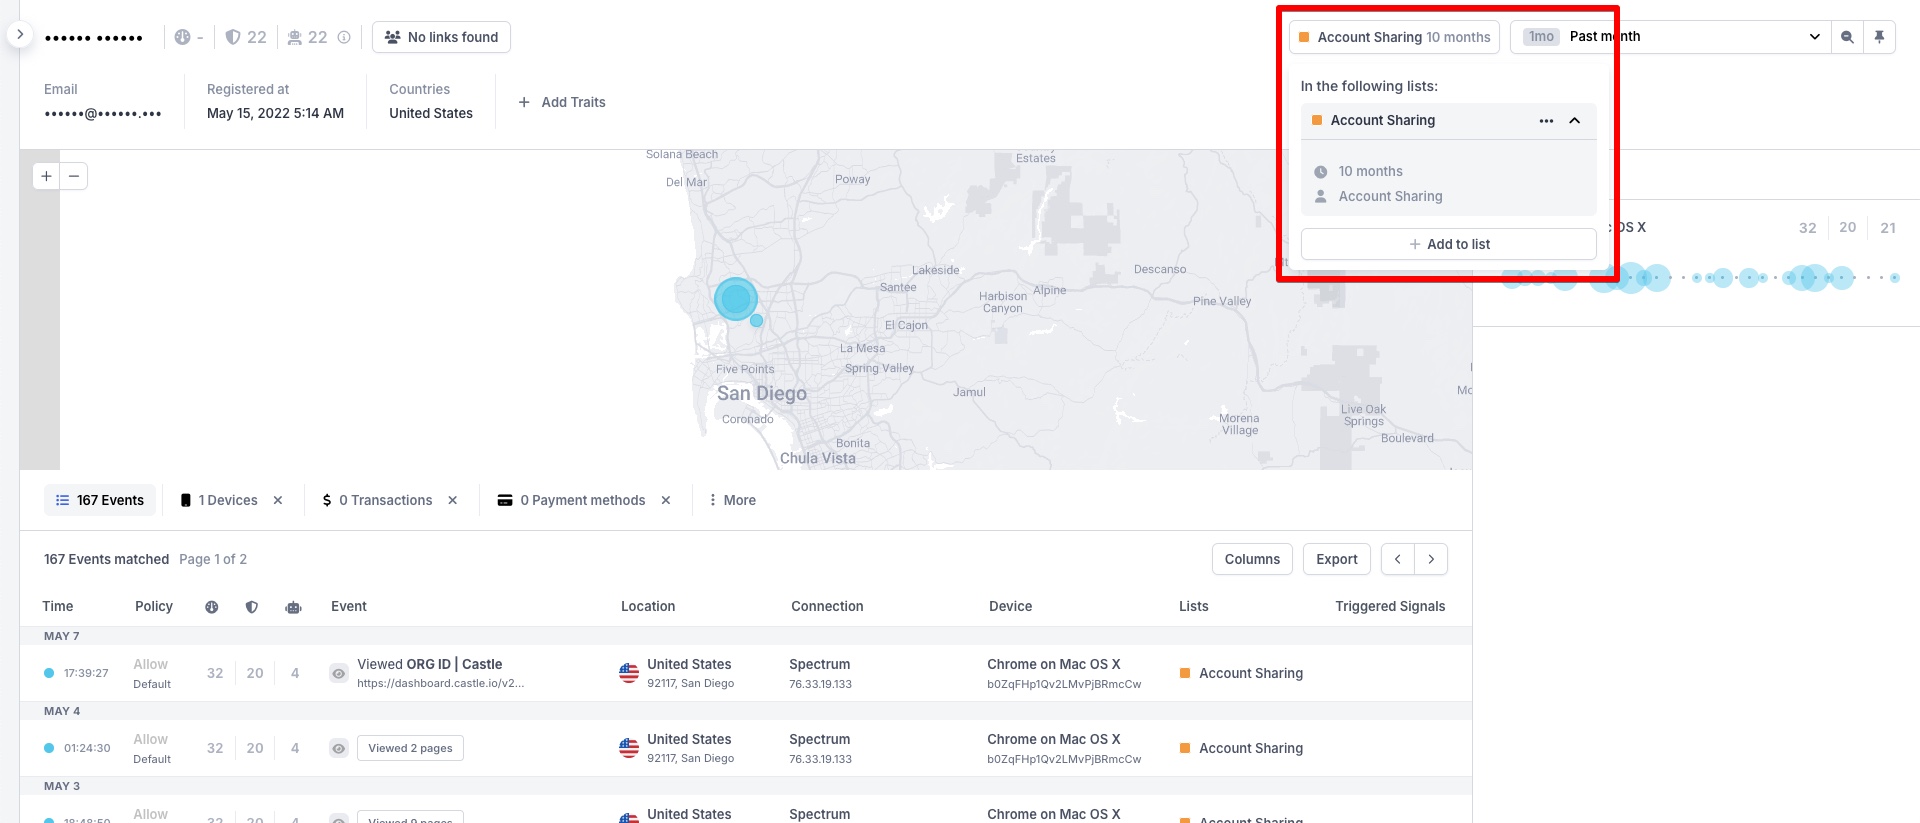
Adding to additional list from the User Details
Using Lists with Policies
Connecting a List to a Policy
Lists serve organizational purposes by default. To take action based on a list's contents, set up a Policy to evaluate the list and provide the appropriate response.
- Create a new list , e.g., "Blocked IPs," specifying IP Address as the primary entity.
- Visit the Policies page and create a new policy.
- Choose the appropriate action, e.g., "Deny" for an IP block list.
- In the policy settings, select Add Filter, then Lists, and choose the lists you want to connect:
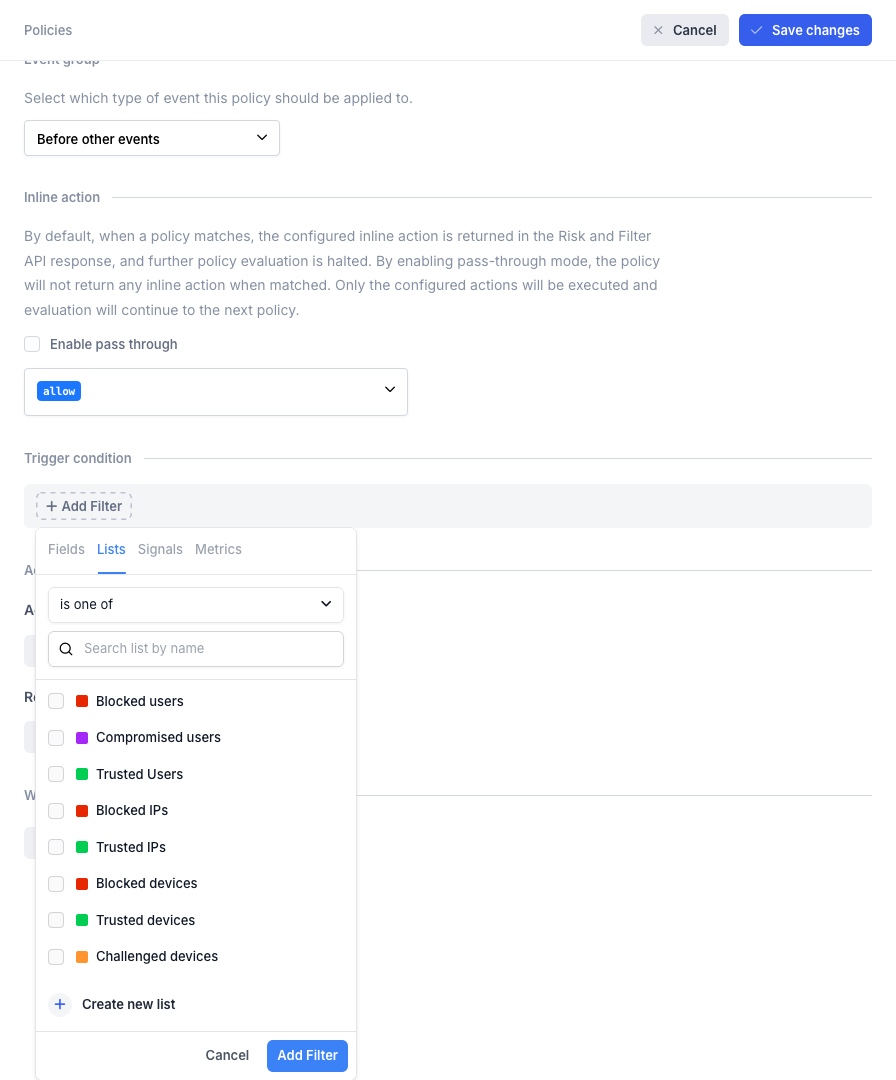
Create Policy with Lists trigger condition
- Activate the policy to ensure that matching data triggers the desired action.
Policy orderPolicies are evaluated sequentially, so arrange them correctly to achieve the desired outcome.
For example, if you create an IP block list, this should be put at the top to make sure matching IPs are always blocked.
Automatically creating / removing list items based on a Policy
Policies can be configured to automatically create or remove list items when conditions are met. This functionality is particularly useful for automatically placing users on a review list based on specific criteria, or for blocking IPs that exhibit abusive behavior.
To automatically create a list item based on a policy, first ensure that you have created the list to which the policy will add items. Then, navigate to the policies page and establish a new policy that specifies the criteria you are targeting (for example, "bot score over 90"). At the bottom of the policy configuration screen, you will find an Actions section. Here, you can designate which lists to add to (or remove from) when the policy is triggered.
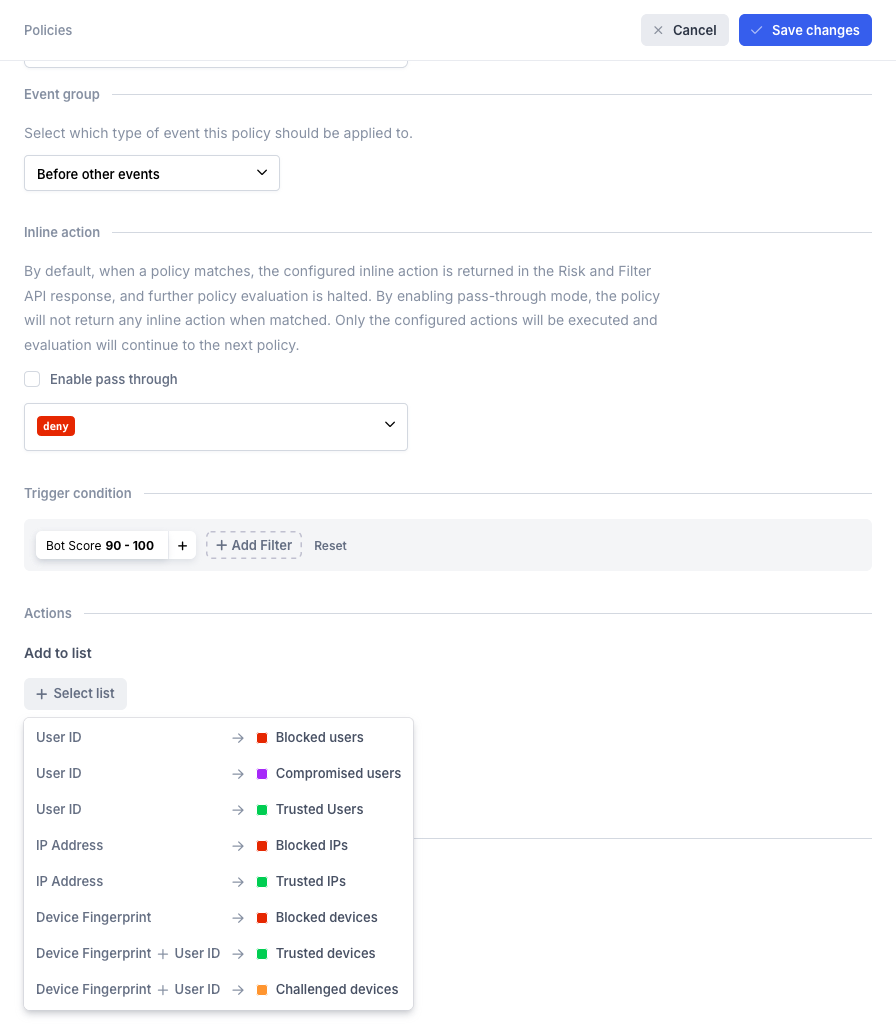
Add items to a list when a policy matches
Auto-archive refresh occurs each time a policy matches, resetting the archivation time.
Using Lists with API and Webhooks
All actions can be managed via API, allowing for custom workflows directly from your apps. See the API reference for details. By integrating the API with webhooks, you can maintain up-to-date synchronization, regardless of where list changes occur. Subscribe to relevant List events when setting up your webhook.
Updated 7 months ago
You can learn how to use lists in our tutorials: