Using CAPTCHA with Castle
Introduction
Do you need a CAPTCHA with Castle?In most cases, no. Castle's behavioral analysis detects bots without requiring users to solve puzzles. However, some teams want to show an explicit challenge for specific UX reasons—like making users feel verified, or adding friction to high-value actions. This guide shows how to conditionally trigger a traditional CAPTCHA based on Castle's
challengeresponse.
This guide will show you how to trigger a CAPTCHA based on the recommended action returned from Castle, which you can implement on your registration form, login form or any other sensitive action that you want to protect. This allows you to take advantage of Castle's advanced bot detection to only show the CAPTCHA when needed. Additionally, once this flow is implemented, you'll be able to control the conditions for triggering the CAPTCHA directly from within the Castle Dashboard, without any modifications to the code.
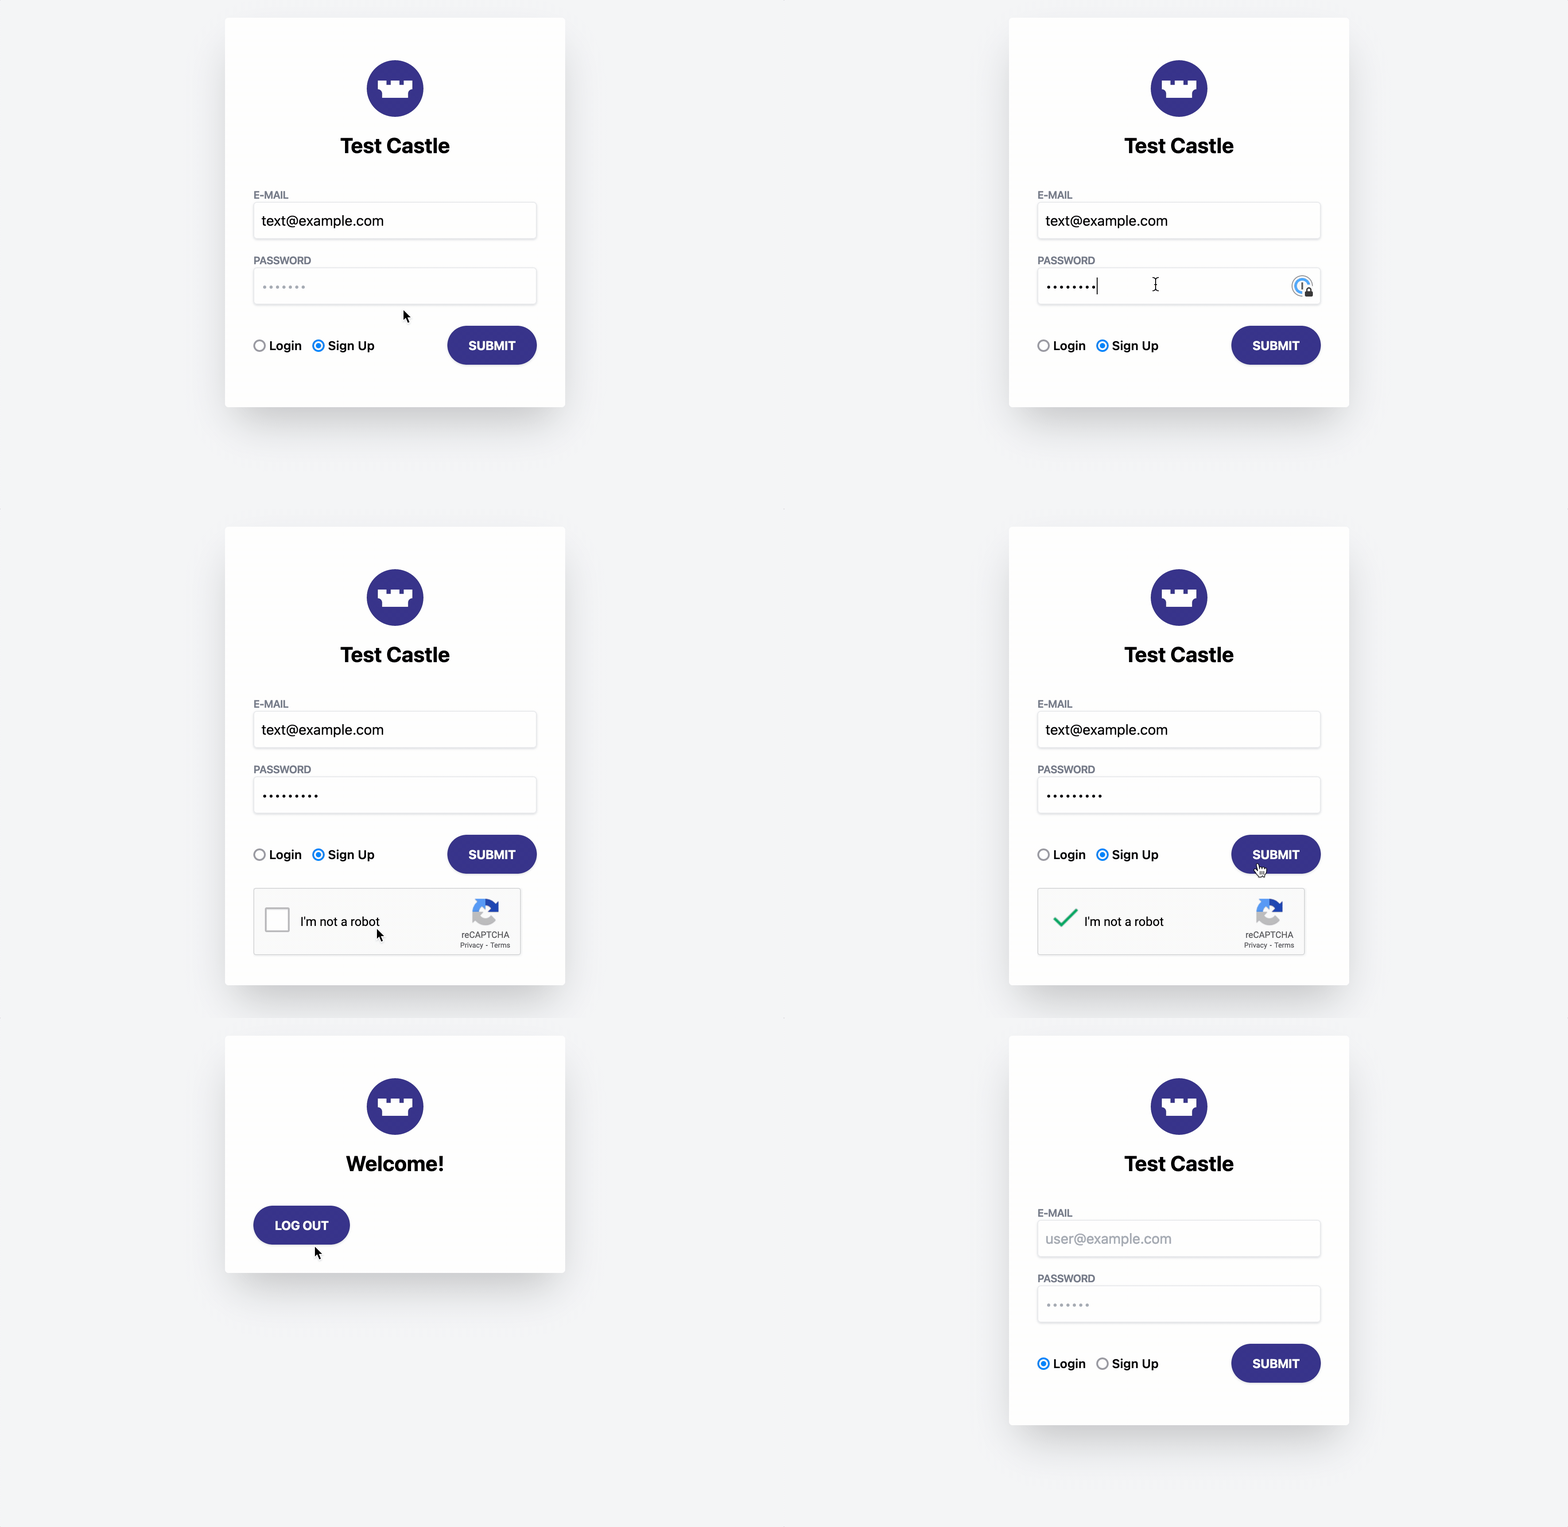
The end result will look like this in the scenario where a CAPTCHA is required. The CAPTCHA will be displayed inline using JavaScript APIs, without any page reloads.

Conditionally triggered CAPTCHA
In this guide, we'll use the Filter API to protect a registration endpoint. We'll use the returned action (allow, challenge or deny) from Castle to trigger the appropriate flow:
- On
allow, proceed with the signup as usual - On
challenge, trigger a CAPTCHA for additional verification. - On
deny, block the request by returning an error
At a high level, we'll be implementing the following steps for dealing with the end-to-end registration process:

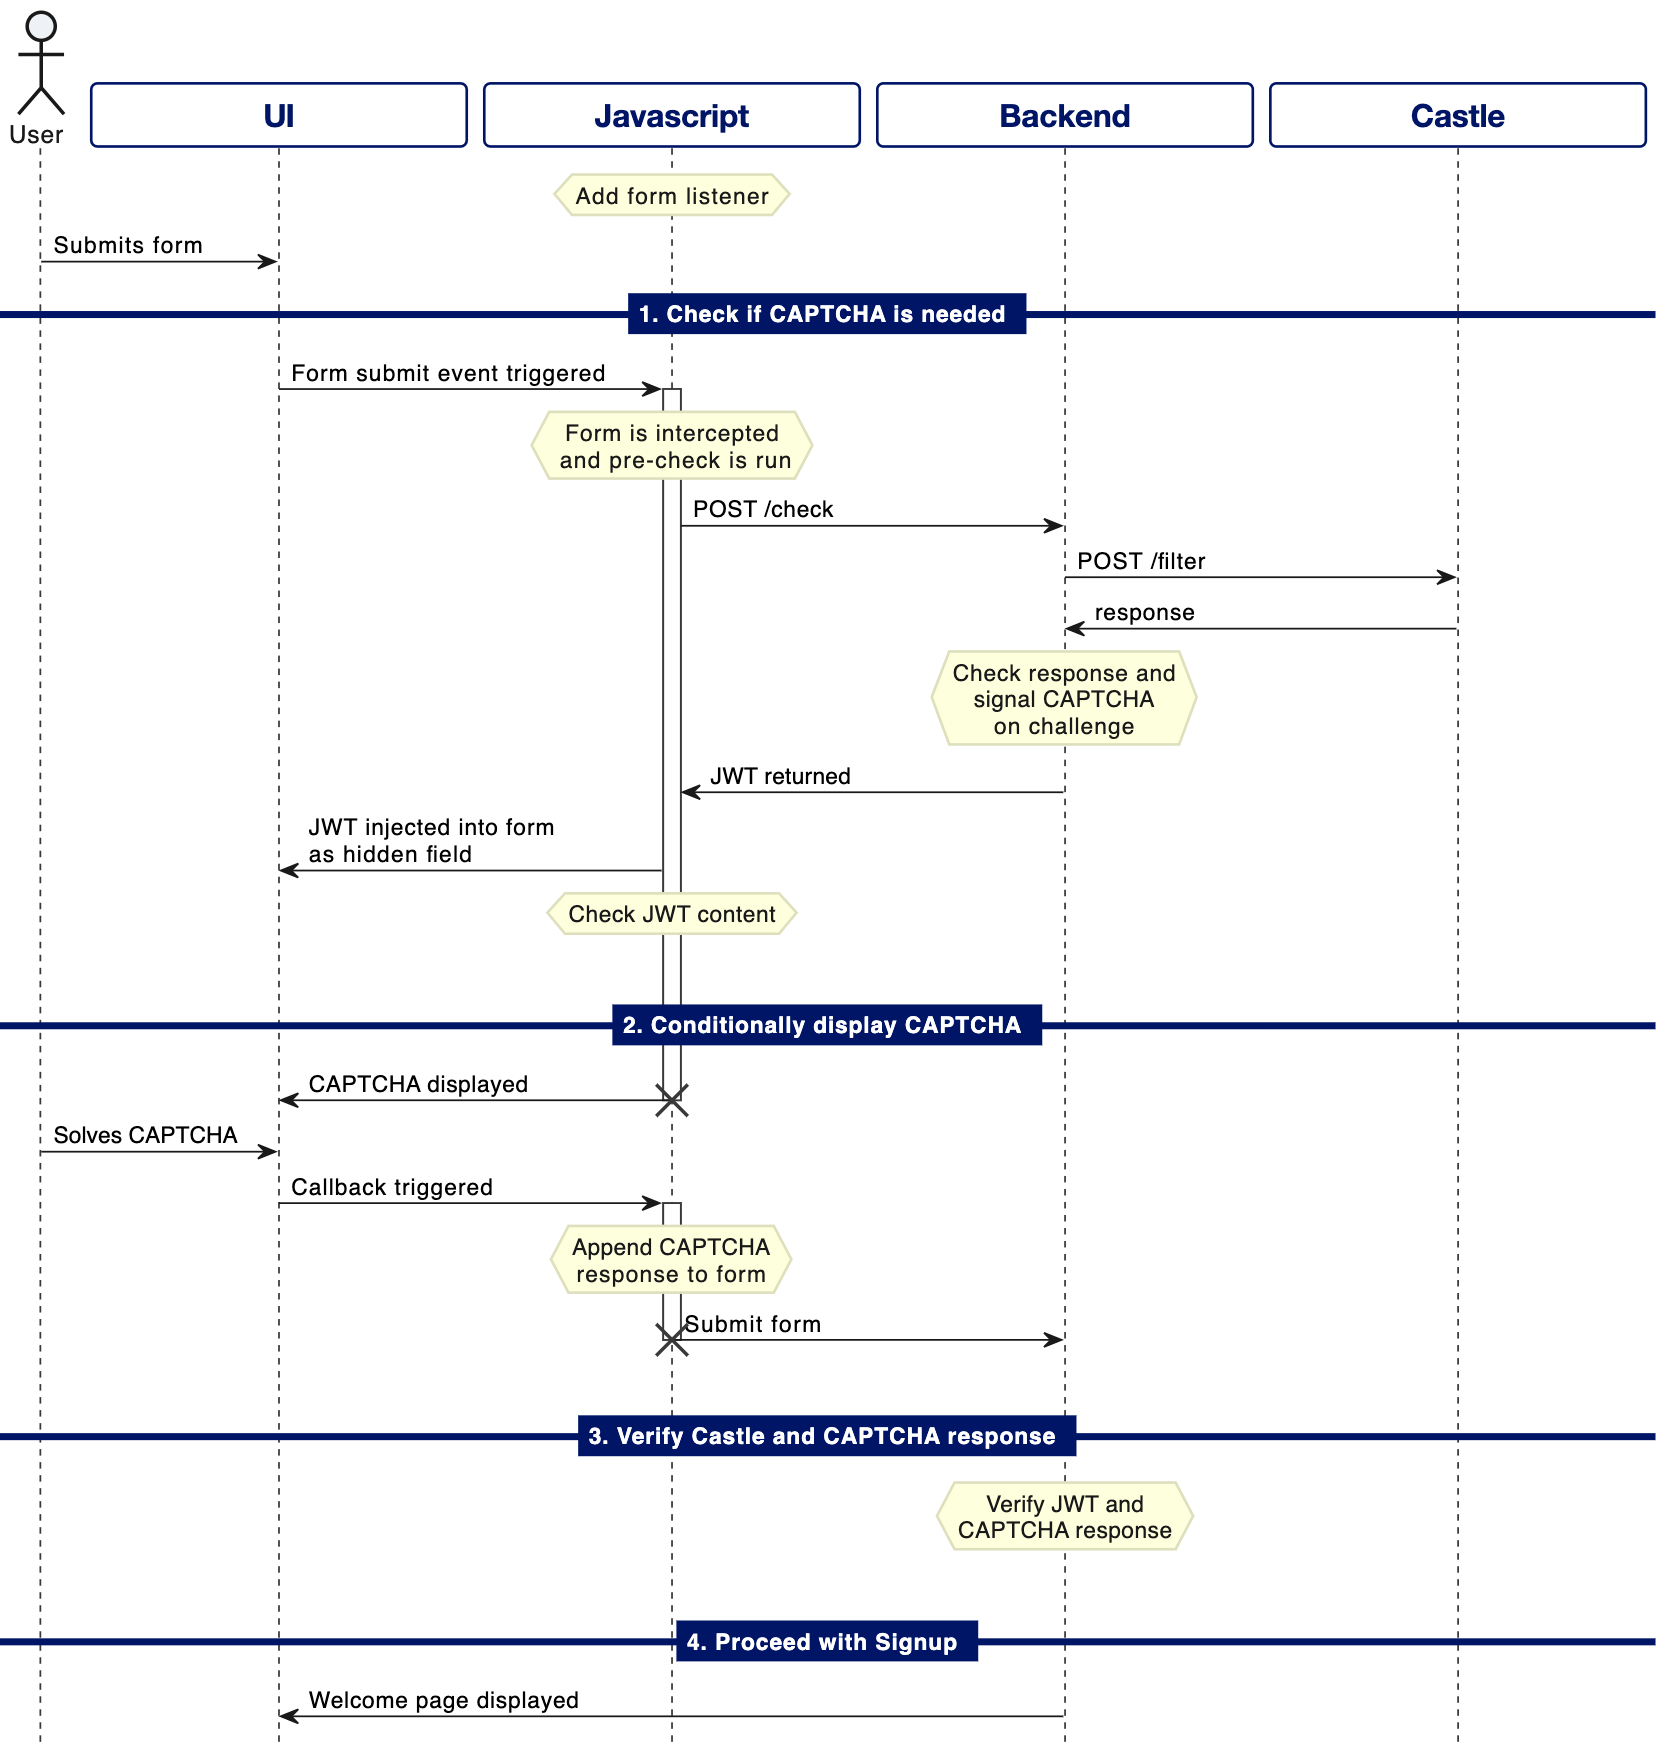
The flow described above will be broken down into the following sequence, which illustrates the interactions between all components involved in the implementation

Sequence for conditionally presenting and solving a CAPTCHA
CAPTCHA for native mobileThis guide implements an adaptive CAPTCHA flow using Castle in a web based environment. However, the same flow can be applied to native mobile environments as well.
Preparing the backend
The /check endpoint
/check endpointFirst, we need to do is to prepare a new endpoint on the backend, which will be responsible for sending a request to Castle and return to the frontend whether a CAPTCHA should be displayed or now. The example code below is written in Ruby, but illustrates what needs to be done. It accepts the same parameters as the regular registration endpoint (email, password etc.), but will only be responsible for sending a request to Castle's Filter API and return a JWT response to the frontend.
Using JWTIn this example, we're using a signed JWT to securely transmit information to the frontend, and preventing it to be tampered with. Alternatively, you can store the outcome from the Castle Filter API in the session, to indicate whether a CAPTCHA needs to be verified at the registration.
# Handler for POST /check
def check
  # Build the correct parameters for the Castle Filter API. See reference.castle.io for details
  user_data = extract_user_data(request)
  params = castle_params(request).merge(
    event: '$registration',
    status: '$attempted',
    params: user_data
  )

  # Send a request to the Castle Filter API and check the recommended action
  castle_response = send_to_castle('filter', params)
  recommended_action = castle_response['action']

  # Encode the action from Castle in a JWT, as well as whether to trigger a CAPTCHA so
  # that the frontend can display the CAPTCHA when needed
  JWT.encode(
    { action: recommended_action, show_captcha: recommended_action == 'challenge' },
    ENV['CASTLE_API_SECRET'],
    'HS256'
  )
end
Response verification
The following method should be called first in the registration controller action, to make sure we have a valid Castle response, as well as any additional CAPTCHA response that needs to be verified.
# Verifies the JWT from the check, as well as the CAPTCHA response if needed
# @param [Hash] params Deserialized form parameters
# @return [Boolean] Returns true if valid response, false otherwise
def valid_response?(params)
  jwt = JWT.decode(params['jwt'], ENV['CASTLE_API_SECRET'], 'HS256').first rescue nil

  # We need a valid JWT to proceed
  return false unless jwt

  # # No need to verify CAPTCHA if Castle said allow or deny
  if jwt['action'] == 'deny'
    return false
  elsif jwt['action'] == 'allow'
    return true
  end

  # If captcha flagged, then verify response
  if jwt['show_captcha']
    return verify_captcha_response(params['captcha_response'])
  end

  true
end
Preparing the frontend
The registration form
In our example, we have a standard signup form submitted by an HTTP POST action. We've added a placeholder div element to house the CAPTCHA UI.
<form id="signup" action="/signup" method="POST">
  <input required type="email" placeholder="[email protected]">
  <input required type="password" placeholder="********">
  <input type="submit" value="Sign up">
  <div id="captcha-1"></div> <!-- Placeholder for CAPTCHA that will be shown if needed //-->
</form>
Connecting the JavaScript
The JavaScript below will intercept the registration form, send a request to the check endpoint that we defined in the previous section, and conditionally prompt the user with a CAPTCHA, if needed. Once solved, the script will append the necessary information to the form, and proceed with the registration attempt
// Helpers
const form = document.getElementById('signup');
let captchaInstance = null;

const showCaptcha = function () {
  captchaInstance = captcha.render('captcha-1');
};

const parseJWT = function(jwtString) {
  return JSON.parse(atob(jwtString.split('.')[1]))
}

const addHiddenFormParam = function(form, name, value) {
  let hiddenField;
  let node;
  for (let i = 0; i < form.childNodes.length; i++) {
    node = form.childNodes[i];
    if (node.getAttribute && node.getAttribute('name') === name) {
      hiddenField = node;
      break;
    }
  }
  if (!hiddenField) {
    hiddenField = document.createElement('input');
    hiddenField.setAttribute('type', 'hidden');
    hiddenField.setAttribute('name', name);
    form.appendChild(hiddenField);
  }
  hiddenField.value = value;
}

const proceedWithFormSubmit = function(form, captchaResponse) {
  // Inject Castle request token as well as any CAPTCHA response as hidden
  // form fields before submitting the form
  Castle.createRequestToken().then(function(requestToken) {
    addHiddenFormParam(form, 'castle_request_token', requestToken);

    if (captchaResponse) {
      addHiddenFormParam(form, 'captcha_response', captchaResponse);
    }

    form.submit();
  });
};

// Attach handler to the registration form
form.addEventListener('submit', function(e) {
  e.preventDefault();

  // If a CAPTCHA was initiated, wait for response before submitting the form
  if (captchaInstance != null) {
    const response = captcha.getResponse(captchaInstance);
    if (response) {
      proceedWithFormSubmit(form, response);
    }
    return;
  }

  // Call the /check endpoint to see if CAPTCHA is needed
  fetch('/check', {
    method: 'POST',
    body: new FormData(form)
  }).then(function(response){
      const jwtString = response.text();
      // Always add the JWT response to the form so it can be verified
      // by the backend later
      addHiddenFormParam(form, 'jwt', jwtString);
      return parseJWT(jwtString);
    })
    .then(function(json) {
      if(json.show_captcha) {
        // CAPTCHA required. Show it and halt form submission until the
        // user has solved it.
        showCaptcha();
      } else {
        // CAPTCHA not required, proceed with registration
        proceedWithFormSubmit(form);
      }
    });
  return false;
});
CAPTCHA implementation
In the code above, we're using a generic way of invoking and collecting the response from a hypothetical CAPTCHA implementation via two methods captcha.render() and captcha.getResponse(). In practice, you may use any CAPTCHA you find suitable, such as your own implementation, reCAPTCHA, hCAPTCHA or GeeTest.
Updated 2 months ago