Account takeover workflows
Introduction
There are three different approaches to dealing with account takeovers:
- Method A: Inline user challenges such as multi-factor authentication (MFA)
- Method B: End-user notifications of suspicious behavior along with ATO self-reporting ("This wasn't me")
- Method C: Automated account locking and recovery
Method A. Inline MFA challenges
You should send $challenge activity to the Risk API whenever the user was prompted with an MFA challenge, regardless of whether it was triggered by a challenge response from Castle, or through any custom application logic. It can also be sent to the Filter API if you want to track activity from before the authentication, e.g. when a CAPTCHA is prompted and solved by the user.
The activity can be sent at different stages of the challenge prompt, which is denoted by setting the status field:
$requested– The challenge was requested from the user, but they didn't yet respond to it. For example, you should set this status when you send a six-digit pin code was to the user.$succeeded– The user completed the challenge, for instance by submitting the correct pin code$failed– The user did not complete the challenge, for instance by submitting an incorrect pin code
📔 You will need to generate and forward the request_token string from your frontend by using the Browser SDK or a Mobile SDK.
castle = ::Castle::Client.new

begin
  token = request.params['castle_request_token']
  context = Castle::Context::Prepare.call(request)

  res = castle.risk(
    type: '$challenge',
    status: '$succeeded',
    request_token: token,
    context: {
      ip: context[:ip],
      headers: context[:headers]
    },
    user: {
      id: 'ca1242f498', # Required. A unique, persistent user identifier
      email: '[email protected]' # Recommended
    },
    authentication_method: { # Optional. See link below
      type: '$phone',
      variant: 'sms'
    }
  )

  if res[:risk] > 0.9
    # IMPLEMENT: Deny attempt
  end

rescue Castle::InvalidRequestTokenError
  # Deny attempt. Likely a bad actor bypassing fingerprinting
rescue Castle::Error => e
  # Allow attempt. Data missing or invalid, or a server or timeout error
end
// NOTE: See the Ruby example for a more comprehensive set of parameters
try {
$token = $_POST['castle_request_token'];
$res = Castle::log([
'type' => '$challenge',
'status' => '$succeeded',
'request_token' => $token,
'context' => [
'ip' => Castle_RequestContext::extractIp(),
'headers' => Castle_RequestContext::extractHeaders()
],
'user' => [
'id' => $user->id,
'email' => $user->email
]
]);
if ($res->risk > 0.9) {
// IMPLEMENT: Deny attempt
}
} catch (Castle_InvalidRequestTokenError $e) {
// Deny attempt. Likely a bad actor bypassing fingerprinting
} catch (Castle_Error $e) {
// Allow attempt. Data missing or invalid, or a server or timeout error
}# NOTE: See the Ruby example for a more comprehensive set of parameters
try:
token = request.form['castle_request_token'] # Using Flask
context = ContextPrepare.call(request)
client = Client()
res = client.log({
'type': '$challenge',
'status': '$succeeded',
'request_token': token,
'context': {
'ip': context['ip'],
'headers': context['headers']
},
'user': {
'id': user.id,
'email': user.email
}
})
if res['risk'] > 0.9:
# IMPLEMENT: Deny attempt
except InvalidRequestTokenError:
# Deny attempt. Likely a bad actor bypassing fingerprinting
except CastleError as e:
# Allow attempt. Data missing or invalid, or a server or timeout error// NOTE: See the Ruby example for a more comprehensive set of parameters
String token = request.getParameter("castle_request_token");
Castle castle = Castle.initialize();
CastleContextBuilder context = castle.contextBuilder().fromHttpServletRequest(request)
try {
CastleResponse response = castle.client().log(ImmutableMap.builder()
.put("type", "$challenge")
.put("status", "$succeeded")
.put(Castle.KEY_CONTEXT, ImmutableMap.builder()
.put(Castle.KEY_IP, context.getIp())
.put(Castle.KEY_HEADERS, context.getHeaders())
build()
)
.put(Castle.KEY_USER, ImmutableMap.builder()
.put("id", user.getId())
.put("email", user.getEmail())
.build()
)
.put(Castle.KEY_REQUEST_TOKEN, token)
.build()
);
float risk = response.json().getAsJsonObject().get("risk").getAsFloat();
if (risk > 0.9) {
// IMPLEMENT: Deny attempt
};
} catch (CastleApiInvalidRequestTokenException requestTokenException) {
// IMPLEMENT: Deny attempt. Likely a bad actor
} catch (CastleRuntimeException runtimeException) {
// Data missing or invalid. Needs to be fixed
}// NOTE: See the Ruby example for a more comprehensive set of parameters
try {
const token = request.body["castle_request_token"]; // Using Express
const castle = new Castle({ apiSecret: 'YOUR SECRET HERE' });
const context = ContextPrepareService.call(request, {}, castle.configuration);
const res = castle.log({
type: '$challenge',
status: '$succeeded',
request_token: token,
user: {
id: user.id,
email: user.email
},
context: {
ip: context.ip,
headers: context.headers
}
});
if (res.risk > 0.9) {
// IMPLEMENT: Deny attempt
}
} catch (e) {
if (e instanceof InvalidRequestTokenError) {
// IMPLEMENT: Deny attempt. Likely a bad actor
} else if (e instanceof APIError) {
// Allow attempt. Data missing or invalid, or a server or timeout error
}
}📔 See the documentation for authentication_method to see all the available options, such as how to specify authentication with SMS or biometrics.
Trusting a user's device
Once the user has successfully passed the MFA challenge, you may want to automatically trust the device so that future login attempts from that device are always allowed for that user (but that user only).
- In order to tell Castle to trust the device, you create a new "Allow" policy to trigger
$challenge$succeeded, and you configure it to add the device to the "Trusted user devices" list.
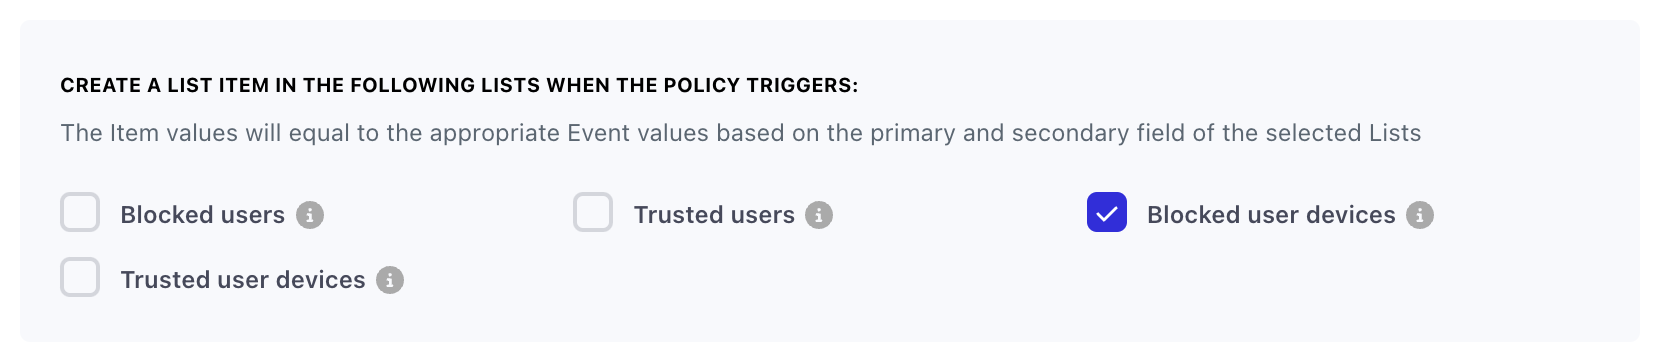
- You'll then create another "Allow" policy for "All events" (or any specific event, based on your preference), which triggers on the "Trusted user devices" matching.


- By using the auto archive feature of lists, you can configure the "Trusted user devices" list to automatically archive devices from the list after a specific time period like 1 hour or 14 days. This will then cause the policy to re-trigger after that time period.
You can read more about how to create a "Trusted user devices" list here.
Method B. End-user notifications of suspicious behavior
In order to build trust with your users over time – and to minimize manual support overhead – it is best to proactively give your users a way to review abnormal activity on their accounts so that they can report and resolve incidents on their own. This section of the guide is for building a “Device Review” landing page on your website where a user can review activity from an unusual device that has accessed their account. With this, users can provide feedback on a wider range of suspicious activity where a malicious incident hasn’t necessarily taken place.
With a review page readily available, you can direct users here whenever moderately suspicious activity occurs on their account. By letting users have the final say in what activity and devices should be approved versus reported, it ensures you can implement a high degree of security without the headaches of false-positives, user complaints, and cumbersome support tickets.
What is considered “Suspicious”?There is a wide range of scenarios where “suspicious” activity is detected. Often it might not be an incident at all. For example, a user could be on vacation and browsing from a new device and geo, or browsing from a VPN. While these may be abnormal signals for a given user, there is not an exceedingly high degree of certainty that an “Incident” has occured. It would be premature and poor user experience to lock the users account in this scenario. Instead, it’s a perfect time to notify the user that unusual activity was detected and ask them to review their activity.
Step 1. Design the review page
Here's an example of the data provided by Castle's /v1/users/USER_ID/devices endpoint:
{
    "total_count": 1,
    "data": [
        {
            "token": "eyJhbGciOiJIUzI1NiJ9.eyJ0b2tlbiI6InJtemtGRkxSeWVNT1U5MGpIbUxqVlhOQmxsam8iLCJxdWFsaWZpZXIiOiJBUUlDQ2pFeE1EQXpOell6T1RBIiwiYW5vbnltb3VzIjpmYWxzZSwidmVyc2lvbiI6MC4zfQ.oIgZE1kzLojvj00VjSACeXmuv8TjQHNIGDygmnW9L1c",
            "created_at": "2021-01-27T21:34:53.697Z",
            "last_seen_at": "2021-01-27T21:34:53.281Z",
            "user_id": "80c43238-375f-4cbc-8bff-357d1c564cf5",
            "approved_at": null,
            "escalated_at": null,
            "mitigated_at": null,
            "context": {
                "ip": "172.56.39.210",
                "location": {
                  "street": null,
                  "city": "San Francsico",
                  "postal_code": 94107,
                  "region": "CA",
                  "country": "US",
                  "lon": -122.3870544,
                  "lat": 37.8019832
                },
                "user_agent": {
                    "raw": "Mozilla/5.0 (Macintosh; Intel Mac OS X 10_9_5) AppleWebKit/537.36 (KHTML, like Gecko)",
                    "browser": "Chrome",
                    "version": "42.0.2311",
                    "os": "Mac OS X 10.9.5",
                    "mobile": false,
                    "platform": "Mac OS X",
                    "device": "Unknown",
                    "family": "Chrome"
                },
                "properties": {},
                "type": "desktop"
            },
            "is_current_device": false
        }
    ]
}
Based on the properties above, a review landing page for a single device might look something like this:

An example prompt asking a user if they recognize the device details
Step 2. Forward user feedback to Castle
Implement server side handlers for the two buttons, and forward the feedback as follows. This step makes use of Castle Lists to ensure that the device is either blocked or allowed from future access.
Reporting a device, a.k.a. "This wasn't me"
-
If the user clicks "No, it wasn’t me", prompt the user with a confirmation dialogue to ensure they want to report this device.
-
Once the user has confirmed the activity, add the User ID +
device.fingerprint(returned in the Castle API response) to a list of blocked user devices. See this guide for more info on how to set up the list corresponding policy -
Display a prompt informing the user that this device has been reported, their account has been locked, and they should check for a Reset Password email.
Note: Reporting a device will trigger an
$incident.confirmedwebhook.
Verifying the identity, a.k.a. "This was me"
The action of approving a device may allow a user to avoid future MFA challenges when they are using that device.
-
If the user clicks "Yes, this was me", prompt the user with a confirmation dialogue to ensure they want to confirm the approval.
-
Once the user has confirmed the activity, send a
$challengeevent with$succeededstatus to the Risk API. See the chapter on Method A for more details on how to send this event.
Forwarding thedevice_tokenSince the device for which feedback is given isn't necessarily the current device, it's critical that you set the
device_tokenfield with the value you received from the webhook. This will ensure that feedback is given for the triggering device, and not the current device.
Theuser.idis optionalThe
device_tokencontains information about which user the device belongs to, so there's no need to set theuser.id.
castle = ::Castle::Client.new

begin
  token = request.params['castle_request_token']
  context = Castle::Context::Prepare.call(request)

  res = castle.risk(
    type: '$challenge',
    status: '$succeeded',
    request_token: token, # Optional
    device_token: "eyJhbGciOiJIUzI1NiJ9....", # Important!
    context: {
      ip: context[:ip],
      headers: context[:headers]
    },
    authentication_method: { # Optional. See link below
      type: '$phone',
      variant: 'sms',
      phone: '+14152928812'
    },
  )

rescue Castle::InvalidRequestTokenError
  # Deny attempt. Likely a bad actor bypassing fingerprinting
rescue Castle::Error => e
  # Allow attempt. Data missing or invalid, or a server or timeout error
end- Similar to step 2 in the previous section, add the UserID +
device.fingerprintto a list of approved user devices as per this guide. You may want to set an expiration time on this list so that the device is not approved forever. - Display a prompt informing the user that their activity was verified, and no further action is needed
Verifying the status of a device
At any point, you can use the List APIs to verify that a specific device is present in either the approved or blocked devices list
Method C. Automated account locking and recovery
If you detect malicious activity on a user account, you should protect the account by locking permissions on the account, notifying the user, and forcing the user to reset their password. If you prefer not to force a password reset, you run the risk of teaching the attacker that evolving their credential stuffing tactics will eventually allow them access into user accounts, regardless of login protections in place. Forcing password resets at first sign of account breach prevents up to 25x more account breaches during a single credential stuffing attack.
Step 1. Lock the account based on webhooks
The first case you need to handle is receiving the $incident.confirmed webhook from Castle, which means that a deny verdict was issued in accordance with your Castle Policy. The policy details are included in the webhook.
Given that you have set up block lists for bad users or devices, the second webhook to handle is the $list_item.created one, which indicates that an item was added to a list. When receiving this webhook you'll have to check that the list name or ID matches the desired one, before taking action, since you'll receive one webhook every time an item is created in any list. Check out the webhook documentation for examples
Castle recommends that you lock the user account at this point. While Castle will continue to issue the deny verdict inline, preventing the bad actor's device from logging into the user account, the underlying problem needs to be addressed: the account credentials can no longer verify that the bearer is the account owner. The credentials have been leaked and abused.
While you can certainly lock the account based on the inline
denyverdict, it's recommended that you instead do it when you receive the$incident.confirmedwebhook since the same webhook can be triggered when either an end-user or analytics manually reports a device.
Step 2. Notify the account owner
You may be familiar with email notifications of account breaches. These emails can be used as a courtesy notification to users, and as a means to establish trust with your users.

An example of an email that can be sent to a user to notify them of an account breach
Castle's Webhooks provide many details that will allow you to craft detailed messages about the user's account breach. Details can include location, time, and device information. It's up to you to brand your communications and convey information to your users in order to maintain their trust.
Castle does not currently offer templates or direct integrations with notifications providers, but feel free to reach out to [email protected] and we're happy to help you craft a tailored account recovery strategy.
Step 3. Force a password reset
Make sure that the owner of the taken over account is forced to change their passwords in order to unlock their accounts.
Good password policies include (among other things) a requirement that no prior passwords are used. You should enforce this unique password policy in order to minimize the success rates of bad actors in future credential stuffing attacks.
Another topic that you should consider is enforcing multiple means of authentication for the password reset event. Since it is known at this point that the user's password is exposed, you might want to consider that the user's email address may be compromised (if they share the password across services). We recommend that you implement a second form of authentication, such as a knowledge-based challenge or a one-time-passcode via SMS, as part of the password reset process.
When the user changes their password, you can send a $profile_reset event, which allows you to both assess the risk of this action, and get visibility into this behavior over time.
Step 4. Set up the post-recovery behavior in Castle
Once the user has gone through the reset process above and recovered their account, it is good practice to remove any friction for the account and associated devices for some time after a new password was set.
In order to accomplish this behavior with Castle, you'll set up two lists and two policies. See the list documentation for more information on how to operate lists. First, create the two lists:
- One list for "Recovered accounts", with User ID as primary field and with an auto-archivation time of 1 hour
- One list for "Trusted user devices", with User ID and Device Fingerprint as primary and secondary field respectively. The auto-archivation time for this list should match your desired security policy, but a good starting point is 30 days.
Then, create the two policies:
- One policy for "Recovered accounts", which looks at the "Recovered accounts" lists and returns an allow action whenever it matches. Additionally, this policy should be set up to add create a list item in the "Approved user devices" list.
- Unless you have set it up already in the previous steps in this document, create one policy for "Approved user devices", which looks at the "Approved user devices" list and returns an allow action whenever it matches.
Step 5. Unlock the account
Now that the user account is reset to a secure state, you can safely unlock it and let the account owner back in. Since Castle is aware of the account being recovered and reset, any future account takeovers will be detected with the same accuracy as the first one.
Updated 7 months ago